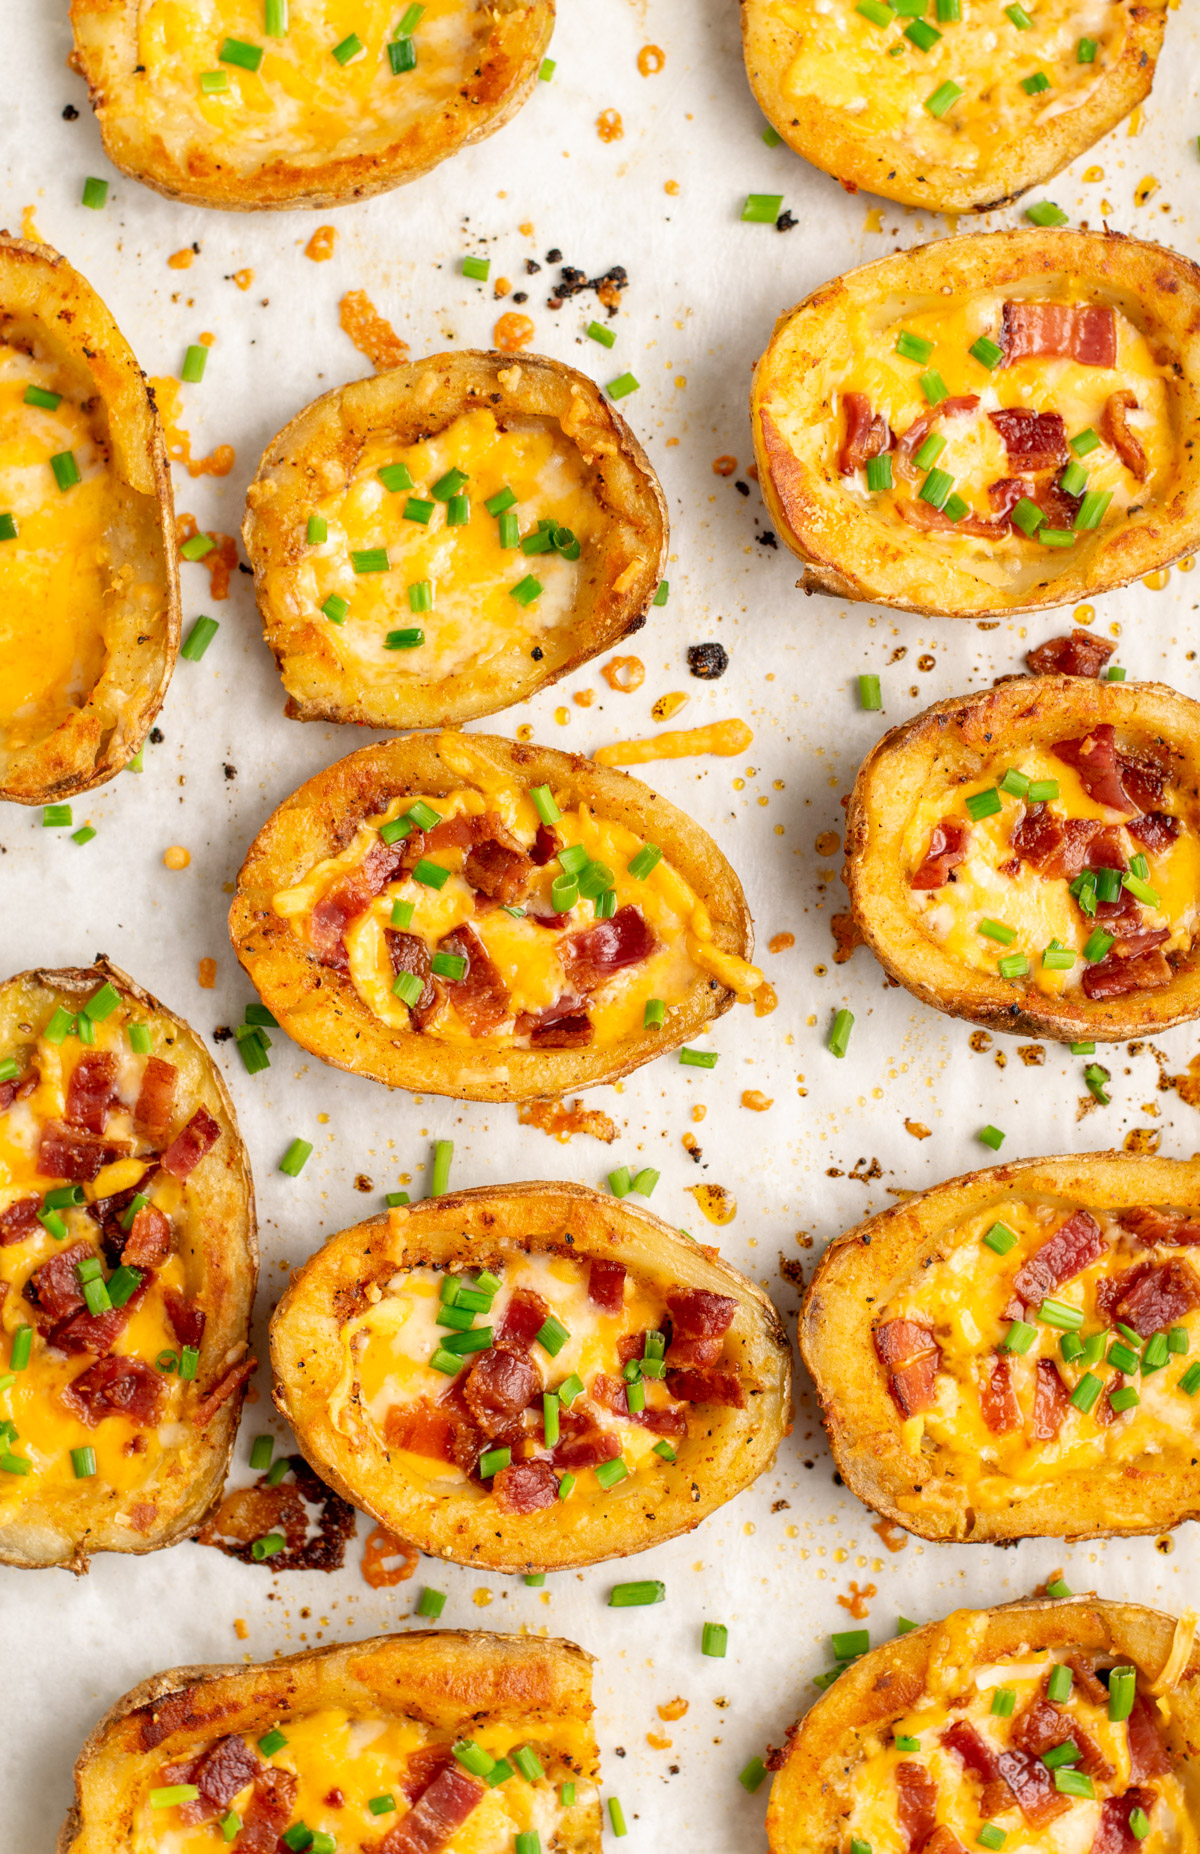
These loaded potato skins are naturally gluten-free and delicious! The perfect game day app is made with a shortcut by microwaving the potatoes. They are then loaded with cheese, bacon, chives, and sour cream. You won't need any other recipe!

These Gluten-Free Loaded Potato Skins are the ultimate game day snack! Crispy potatoes are hollowed out and stuffed with cheese, bacon, and chives. Of course sour cream is the ultimate dipping sauce.
This recipe suggests a time-saving shortcut to microwave the russet potatoes to cook them, taking just a fraction of the time that an oven would take. That allow this whole recipe to be made from start to finish in under an hour! Have your loaded potato skins whenever you're craving them.
These crispy, cheesy potato skins are the ultimate tailgate snack. Pair them with my gluten-free mozzarella sticks, no bean chili, or buffalo cauliflower wings. Keep reading to learn just how easy they are to make.
Jump to:
Why You'll Love This Recipe
- Easy cooking shortcut. Microwave instead of roast the potatoes to make these even quicker!
- Ready in under 60 minutes.
- Super delicious and indulgent. The ultimate game day app!
- Allergy-friendly. This recipe is gluten-free, nut-free, and easily vegetarian, dairy-free or vegan.
- Super customizable. Change up the type of potato, dairy, spices, or toppings.
Ingredient Notes
Here are the main ingredients you'll need to make these gluten-free loaded potato skins:

- Russet potatoes: These produce the crispiest skins, though you could try the same method with other potatoes.
- Olive oil
- Salted butter: A spiced butter gives the potato skins amazing flavour.
- Garlic powder, onion powder, paprika: These are my go-to spices, but use your favourites.
- Salt & pepper: Add a pinch more salt if using unsalted butter. Salt to your preferences.
- Cooked bacon: Omit for vegetarian.
- Shredded cheddar cheese: I like old cheddar but you could use marble, mozzarella, or whatever you have. Use dairy-free if preferred.
- Chives or green onions: I love the little bit of freshness that these give when sprinkled on top.
- Sour cream: Again, sour cream adds so much freshness to these cheesy, heavy potato skins. Omit or use dairy-free if preferred.
Substitutions
Change up these potato skins depending on your taste! Here are some suggestions:
- Use a different potato. Use what you have on hand. This technique will work for white, russet, or sweet potatoes.
- Make them dairy-free. Just use your favourite vegan butter and vegan cheese.
- Make them vegetarian. Omit the bacon or use plant based crumbles
- Add spice or flavor. Add nutritional yeast, roasted garlic, hot sauce—you name it.
- Dip 'em. Sour cream, ranch, dill dip, or buffalo sauce would all be delicious dips.
Equipment
No special equipment is needed for this recipe. You will need a large baking sheet and some parchment paper for the oven. If you choose the shortcut to cooking the potatoes, you will need a microwave as well.

Step-by-Step Instructions
Be sure to read the recipe card below for the full ingredient list and instructions for how to make loaded potato skins.
To cook potatoes in the microwave
Save time and energy by cooking the russet potatoes in the microwave.
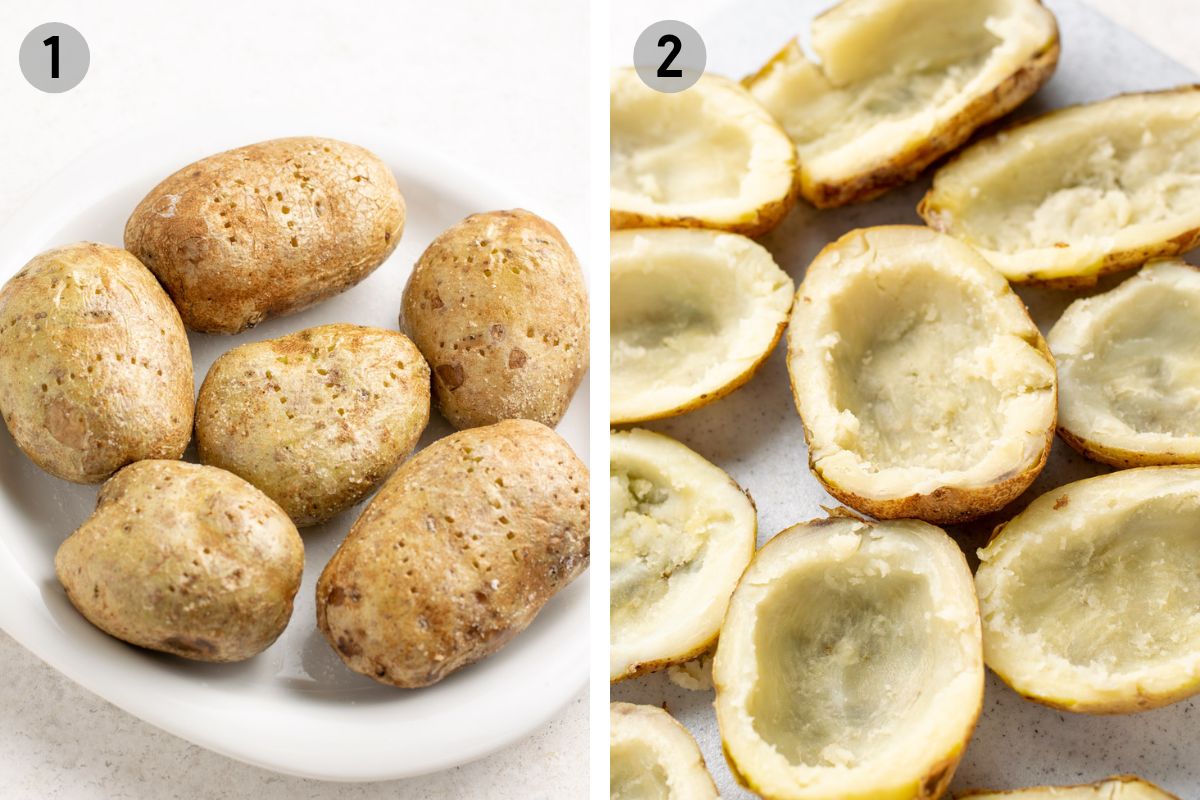
(1) Prick the potatoes all over with a fork. Rub them with olive oil, then place on a plate and microwave for 5 minutes. Carefully flip them with tongs and cook for another 5 minutes. Continue cooking and rotating until they no longer feel firm to the touch. When a fork slides in relatively effortlessly, they’re done.
My 6 potatoes took 19 minutes total in a medium-powered microwave. If you are making more potato skins then you may have to do batches, or cook them in the oven.
To cook potatoes in the oven
Prick the potatoes all over with a fork. Rub them with olive oil, then place on a baking sheet and bake at 400ºF for about 1 hour, until no longer firm and a fork slides in effortlessly.
To assemble potato skins
(2) Once cooked, let the potatoes cool to the touch and preheat the oven to 425ºF. Slice them in half lengthwise. Use a large spoon to scoop out most of the insides, leaving a small rim of potato inside. Discard the insides or save for another recipe.
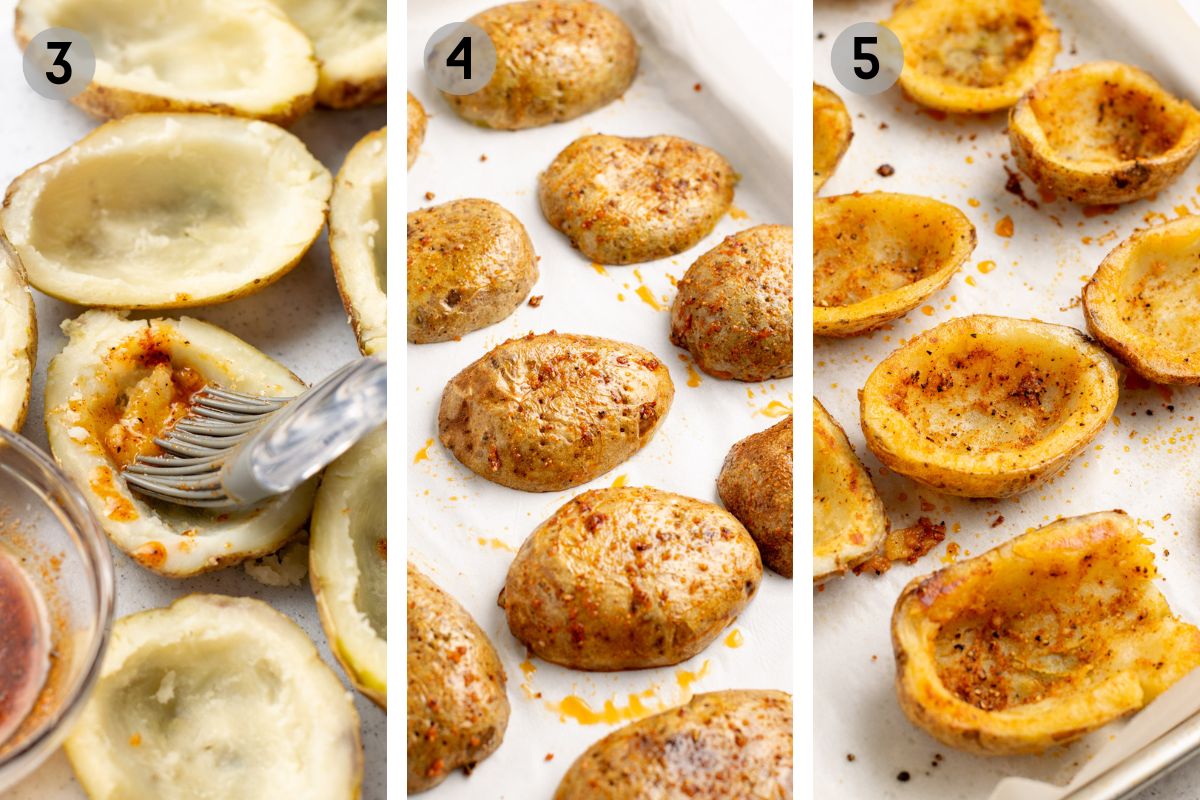
Melt the butter in a small bowl. Mix in the spices.
(3) Use a pastry brush to brush both sides of the potatoes skins with the butter mixture.
(4) Place the potato skins cut side down on a parchment lined baking tray.
(5) Bake for 10 mins, then flip and bake for another 10 mins.
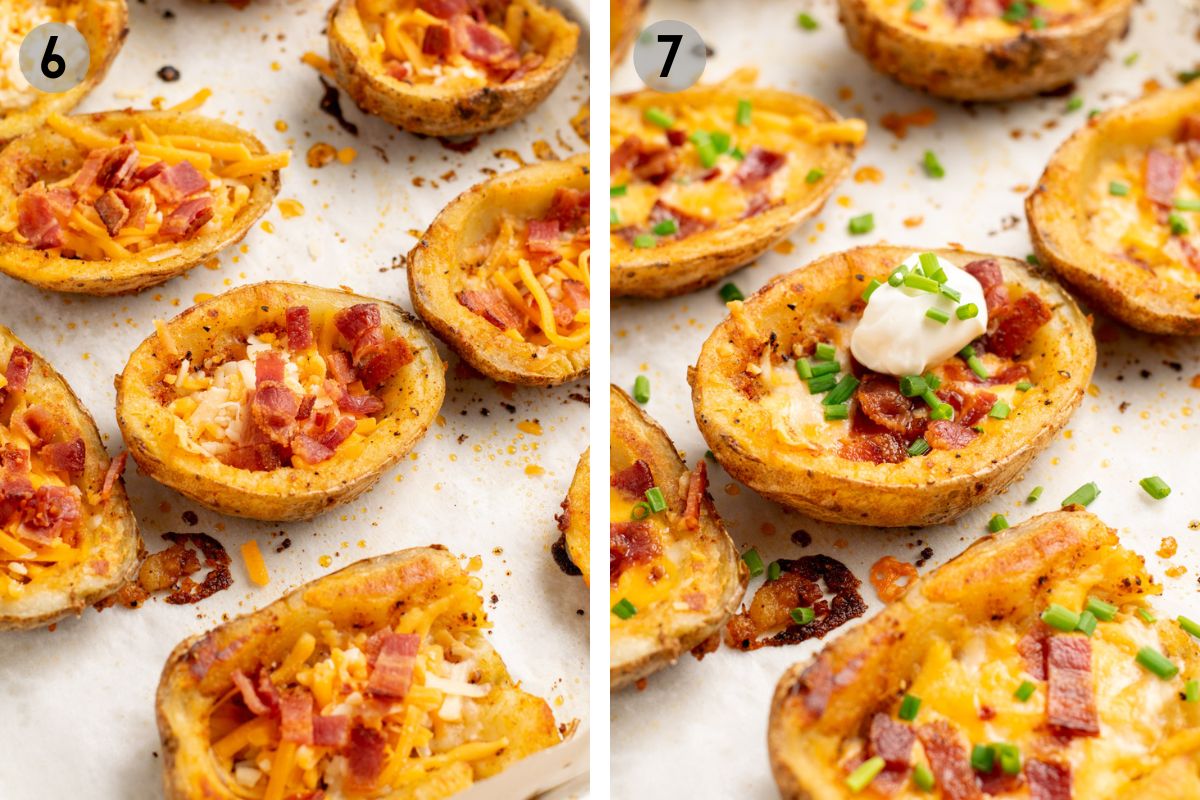
(6) Add the cheese and bacon bits, then bake for 5 more minutes. You can even broil for 2-3 minutes to get them extra crispy.
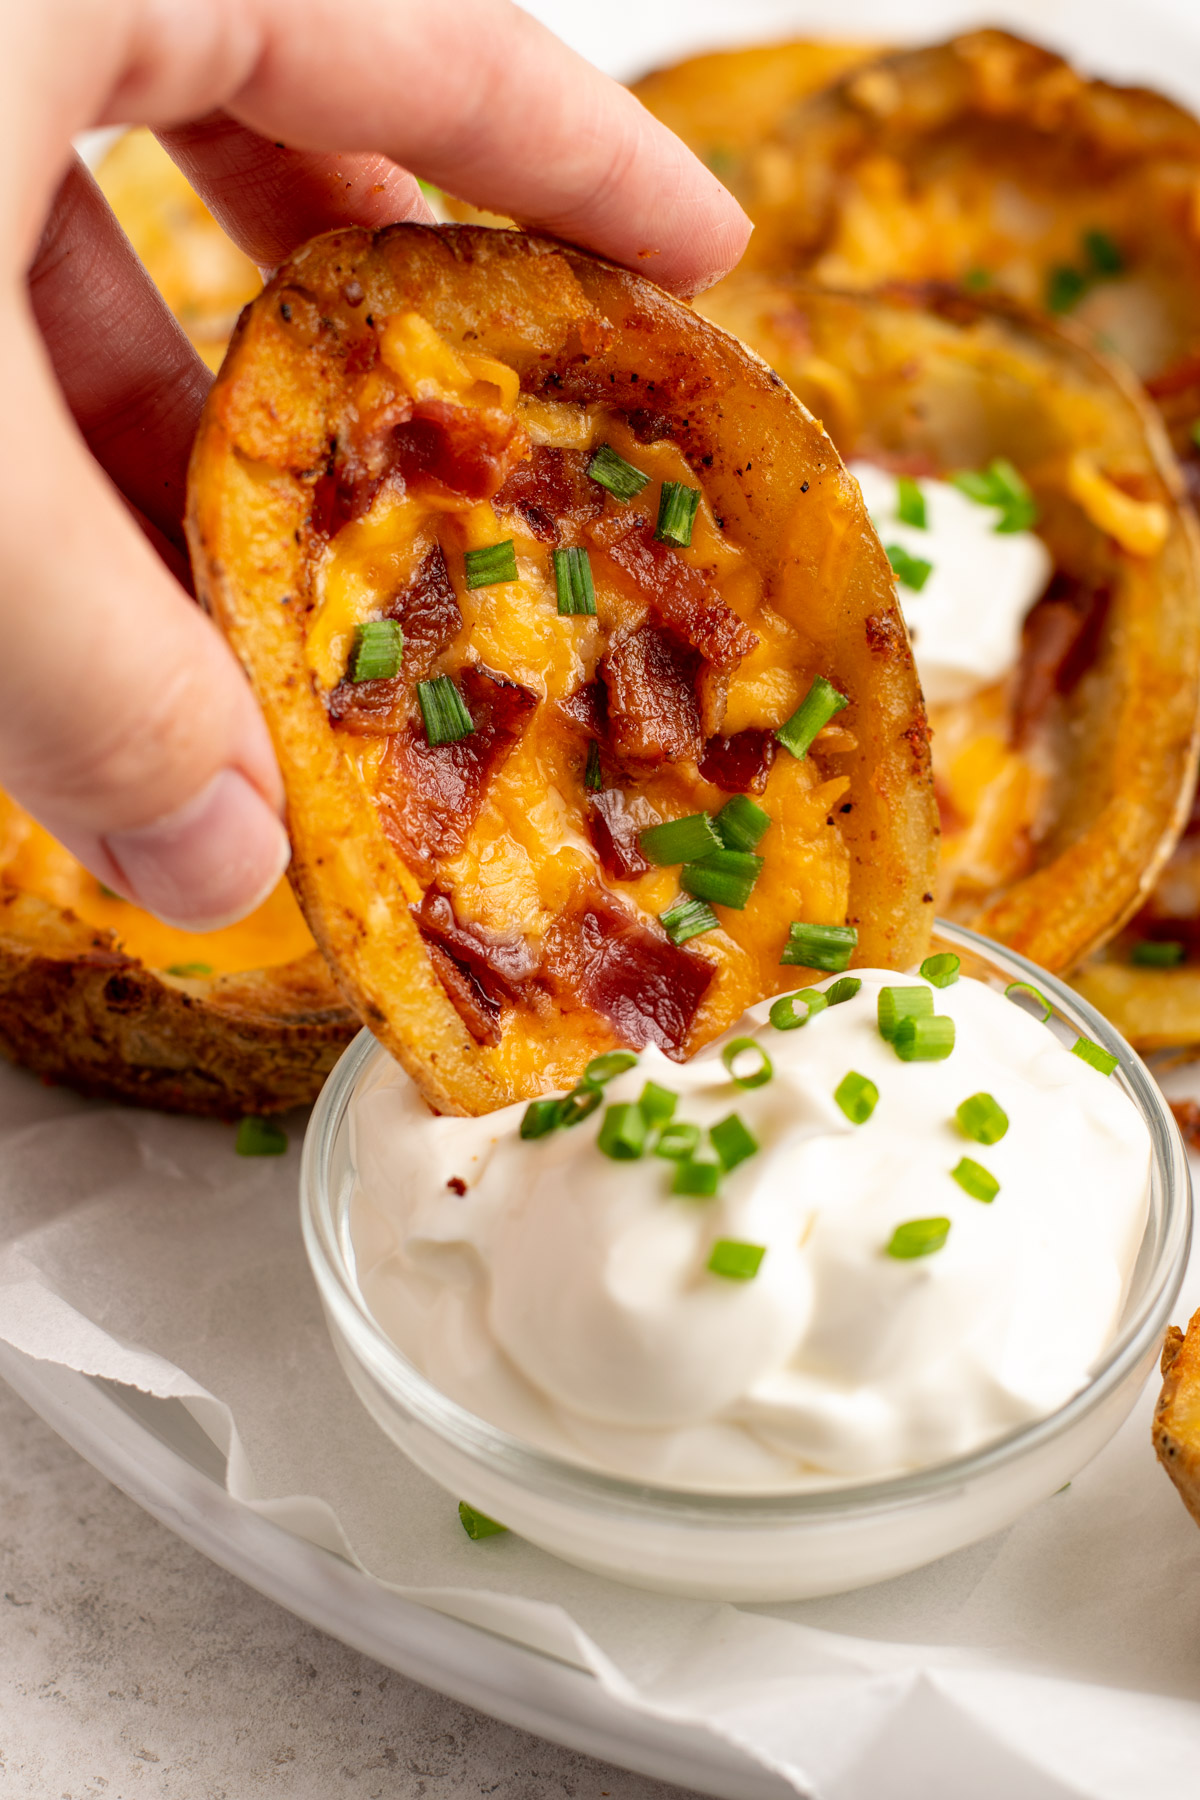
(7) Top with fresh chives, green onions, and/or sour cream. Serve immediately and enjoy!
What to Serve with Gluten-Free Potato Skins
Potato skins are a tailgate classic. Whip them up while watching the game—any game. Whether it's football, soccer, basketball, or baseball season, loaded potato skins are always on the menu. Here are some more game day recipes to pair them with:
- No Bean Chili
- Gluten-Free Fried Pickles
- Gluten-Free Mozzarella Sticks
- Gluten-Free Jalapeño Poppers
- Vegan Buffalo Cauliflower Wings
- Gluten-Free Fried Chicken
- Gluten-Free Onion Rings
- Gluten-Free Burgers
- Vegan BBQ Jackfruit Sandwiches
- Mango Pico de Gallo
- Gluten-Free Taquitos
- Vegan French Onion Dip
Make Ahead & Re-heating
Prepare the potato skins until you are about to put the cheese and bacon on. Cool the potatoes then add the cheese and bacon to the potato skins. Place the potato skins in an airtight container for up to 24 hours. When ready to serve, place them on a baking sheet and bake at 400ºF for 5-10 minutes.
Storage & Freezing
Storage: Leftover potato skins can be cooled and stored in the fridge in a closed contain for up to 5 days. Reheat in the air fryer or oven at 400ºF for 3-5 minutes.
Freezing: Cooked and cooled potato skins can be frozen in an airtight container for up to 2 months. Reheat in the oven or air fryer at 400ºF for 5-10 minutes. Ideally, freeze before the cheese has been cooked so it may cook while reheating.
Expert Tips
Here are some of my top tips and tricks for the best loaded potato skins:
- Ensure the potatoes are cooked enough, but not too much. When a fork can stab the potatoes without resistance, they are ready to scoop. Underdone and it will be too hard to scoop out the flesh, and if overdone they may not get crispy.
- When scooping out the centre, leave a rim of potato around the edges. Otherwise your potato skins may fall apart.
- Re-use the inside of the potatoes. Make mashed potatoes so you have less food waste.
- Change up the toppings depending on your preferences. You can easily make these potato skins dairy-free, vegan, or vegetarian by changing up the fillings.
- Dip them. Potato skins are best served immediately when hot. Dipping them in a cool dip like sour cream, ranch, or dill dip contrasts so well with the hot, cheesy potato.
Frequently Asked Questions
Russet potatoes are the type that I recommend in this recipe since their skin is robust and crisps up well. Other types of potato may work, though their skin may not get as crispy to hold up to the fillings.
While it differs across types of potatoes, there are generally a lot of minerals and antioxidants in potato skin. The skins often hold fibre, potassium, magnesium, and several antioxidants.
This recipe is naturally gluten-free! If you are purchasing potato skins, you will always want to check the ingredient list to ensure that there is no wheat or gluten-containing ingredients.
These loaded potato skins are easy, delicious, and naturally gluten-free! The perfect appetizer for your game day spread, this recipe is sure to be a crowd pleaser!
More Gluten-Free Apps:
- No Bean Chili
- Gluten-Free Fried Pickles
- Gluten-Free Mozzarella Sticks
- Gluten-Free Jalapeño Poppers
- Vegan Buffalo Cauliflower Wings
- Gluten-Free Onion Rings
- Gluten-Free Taquitos
- Vegan French Onion Dip
Related Recipes


Have you made these loaded potato skins? I'd very much appreciate it if you leave a 5-star ⭐️⭐️⭐️⭐️⭐️ review below, and tag me on instagram @fromoliviaskitchen!
Recipe

Gluten-Free Loaded Potato Skins
Ingredients
- 6 russet potatoes
- 1 tablespoon olive oil
- 2 tablespoon salted butter
- ½ teaspoon garlic powder
- ½ teaspoon onion powder
- ½ teaspoon paprika
- ¼ teaspoon salt
- ½ teaspoon pepper
- 4 slices cooked bacon omit for vegetarian
- 1 ½ cup shredded cheddar cheese use dairy-free if preferred
- 2 tablespoon chives or green onions
- ⅓ cup sour cream for serving omit or use dairy-free if preferred
Instructions
To cook potatoes in the microwave
- Prick the potatoes all over with a fork. Rub them with olive oil, then place on a plate and microwave for 5 minutes. Carefully flip them with tongs and cook for another 5 minutes. Continue cooking and rotating until they no longer feel firm to the touch. When a fork slides in relatively effortlessly, they’re done.
- My 6 potatoes took 19 minutes total in a medium-powered microwave. If you are making more potato skins then you may have to do batches, or cook them in the oven.
To cook potatoes in the oven
- Prick the potatoes all over with a fork. Rub them with olive oil, then place on a baking sheet and bake at 400ºF for about 1 hour, until no longer firm and a fork slides in effortlessly.
To assemble potato skins
- Once cooked, let the potatoes cool to the touch and preheat the oven to 425ºF. Slice them in half lengthwise. Use a large spoon to scoop out most of the insides, leaving a small rim of potato inside. Discard the insides or save for another recipe.
- Melt the butter in a small bowl. Mix in the spices.
- Use a pastry brush to brush both sides of the potatoes skins with the butter mixture. Place the potato skins cut side down on a parchment lined baking sheet. Bake for 10 mins, then flip and bake for another 10 mins.
- Add the cheese and bacon, then bake for 5 more minutes. You can even broil for 2-3 minutes to get them extra crispy.
- Top with chives, green onions, and/or sour cream. Serve immediately and enjoy!
Notes
- For dairy-free potato skins: Use dairy-free cheese and sour cream.
- For vegetarian potato skins: Omit the bacon or add plant-based crumbles.
- Make ahead: Prepare the potato skins through assembly step 3. Cool the potatoes then add the cheese and bacon on the potato skins. Place the potato skins in an airtight container for up to 24 hours. When ready to serve, place them on a baking sheet and bake at 400ºF for 5-10 minutes.
- Storage: Leftover potato skins can be cooled and stored in the fridge in a closed contain for up to 5 days. Reheat in the air fryer or oven at 400ºF for 3-5 minutes.
- Freezing: Cooked and cooled potato skins can be frozen in an airtight container for up to 2 months. Reheat in the oven or air fryer at 400ºF for 5-10 minutes. Ideally, freeze before the cheese has been cooked so it may cook while reheating.
Comments
No Comments