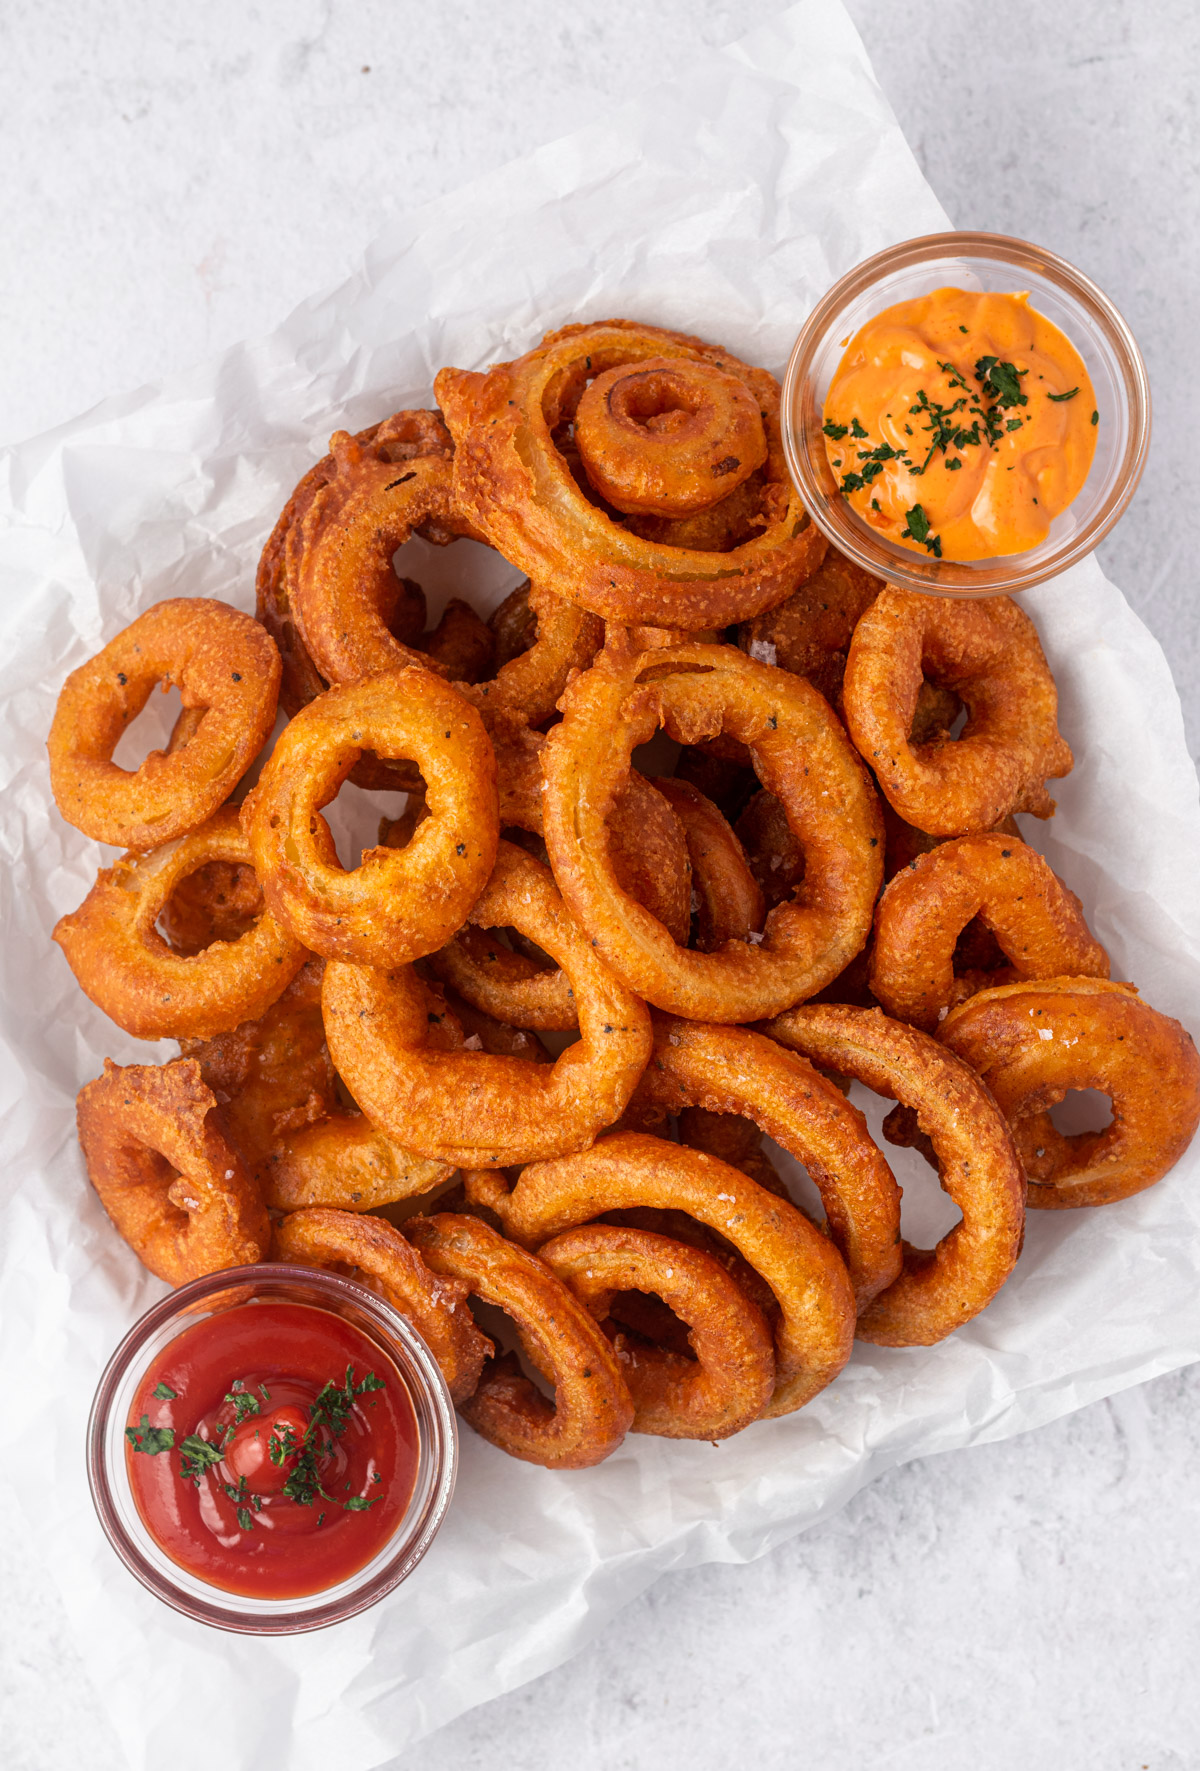
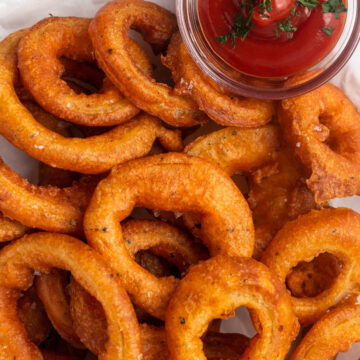
These gluten-free onion rings taste like they came straight from a restaurant. They're battered and crispy, not to mention gluten-free and dairy-free!

Feel like you're at the pub with these homemade gluten-free and dairy-free onion rings! Thick cut onion slices coated in a fluffy and crispy batter then shallow fried in heart-healthy avocado oil—what could be better?!
These easy gluten-free onion rings are crispy, crunchy, and delicious when dipped in your favourite sauce. They are made in a traditional wet batter that is fried without breadcrumbs. Serve as an appetizer, side, snack, you name it! Want to learn how you can make them in just under 30 minutes? Keep on reading!
Want more appetizer ideas? Check out my Gluten-Free Focaccia Bread, Fig & Prosciutto Pizza, or Vegan Buffalo Cauliflower Wings.
Jump to:
Why You'll Love This Recipe
- Quick & easy to make. You can have homemade onion rings in just under 30 minutes!
- Tastes like restaurant quality, but a little healthier. At home, you can control the ingredients. This means you can use gluten-free flour, dairy-free milk, and heart-healthy avocado oil.
- Freezer-friendly. Prepare ahead so you can have gluten-free onion rings for when the craving strikes! These onion rings store great in the freezer and can be reheated in just a few minutes.
Ingredients Needed
Here is everything you'll need to make these easy gluten-free onion rings:

These onion rings can be served as an appetizer, side, snack, you name it! They are gluten-free, dairy-free, vegetarian, AND delicious. What more could you ask for? Here are a few notes on the ingredients:
- Avocado oil: This is my favourite oil for frying. It is relatively unprocessed and better for your heart and health when compared to common frying oils like canola, sunflower, or grapeseed.
- Yellow or white onion: You can really use whatever type of onion you have on-hand. This recipe makes batter for 1 medium-large onion. If yours are smaller, use 2 onions.
- Cornstarch: Cornstarch is often used in these types of airy batters. It retains a nice crunch when fried and is good for dusting the onions before battering. Use tapioca starch if you don't have cornstarch.
- Gluten-free all-purpose flour: The use of flour along with the cornstarch gives the batter a little more structure. As usual, my favourite flour is Bob Red Mill's 1:1 Baking Flour (blue bag).
- Baking powder: This reacts with the wet ingredients to make the coating airy, crispy, and crunchy. It's an integral ingredient.
- Salt: These onion rings really need a good pinch of salt for bring out their flavour.
- Spices: black pepper, paprika, onion powder, cayenne: These are my favourite spices, but add any more that you like. You can also increase the cayenne for more heat.
- Egg: Egg helps the batter to bind together and to the onion rings.
- Milk: Thins out the batter and activates the baking powder. This recipe will work with any milk you have, lactose-free or dairy-free as well. If you find as you go that the batter starts to become a bit thick, add a splash of additional milk to make it more workable.
Step-by-Step Instructions
Be sure to read the recipe card below for the full ingredient list and instructions for how to make gluten-free onion rings.
Prep
Pour the avocado oil into a medium size, heavy bottom pot. Turn the heat to medium and allow the oil to heat up while you prep. It should only be about 2 inches deep.
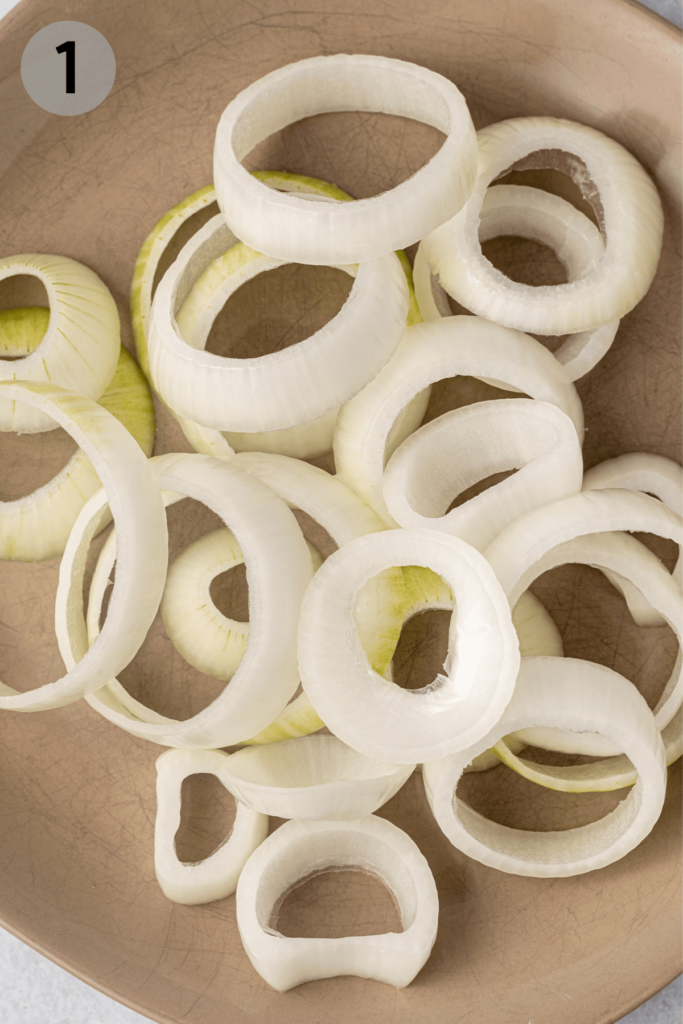
(1) Peel the onion and slice into thick rings, just over ½" wide. Separate all of the rings.
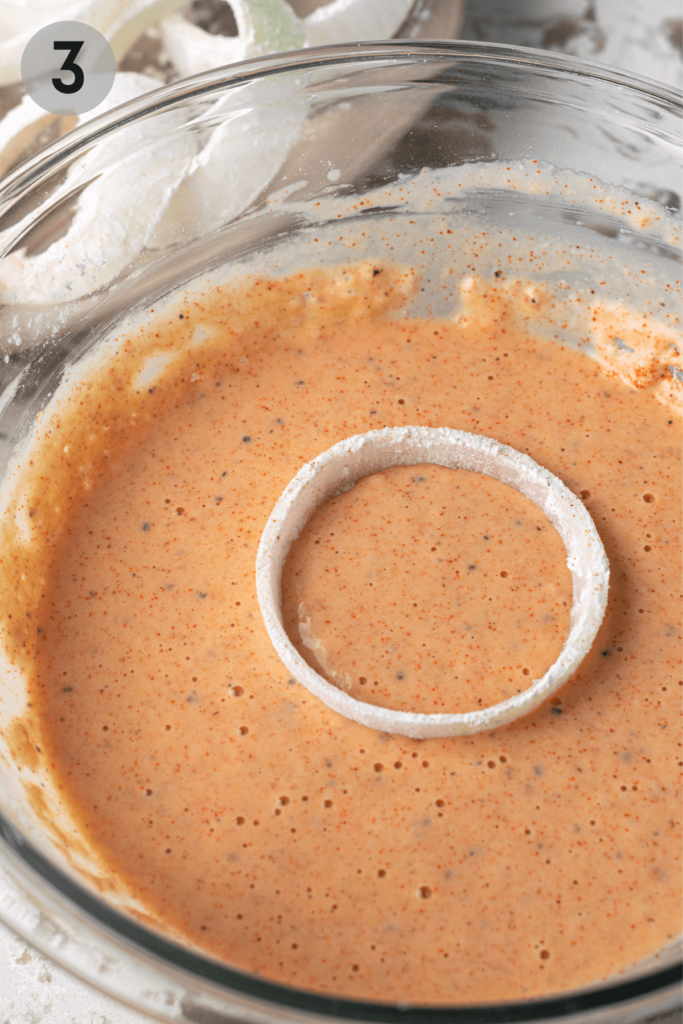
(2) In a medium-size bowl, mix together the dry ingredients: cornstarch, flour, baking powder, salt, and spices. Stir with a fork to mix evenly. One at a time, place each onion ring in the bowl and use the fork or your hands to ensure it is evenly coated on the inside and outside. This will absorb the natural moisture from the onion and help the batter adhere better. Place dusted onions on a plate.

Once all of the onions are dusted, whisk the egg and milk into the dry ingredients. You should have a slightly thick and bubbly batter.
Frying
To test that the oil is ready, drop a small amount of batter into the pot. It should bubble and brown over 30 seconds. If it does not bubble, the oil is not hot enough. If it instantly browns or even blackens, the oil is too hot. Lower the heat and move the pot to the side for a few minutes.
(3) One at a time, take a dusted onion ring and dip it into the wet batter, using a fork to flip and ensure all sides are coated. Let any excess drip off before gently placing in the hot oil. Repeat with as many onion rings as will fit in the surface area of your pot.
(4) They should brown on the bottom within about 30 seconds. Once brown and bubbled on the bottom, gently flip the onion rings using a fork or tongs.
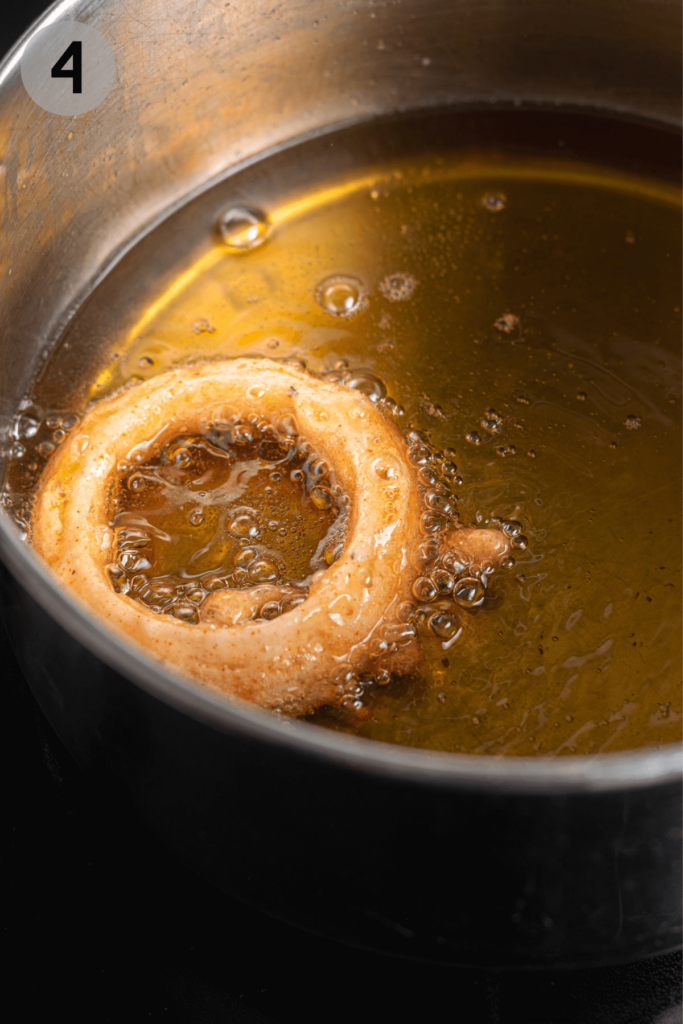
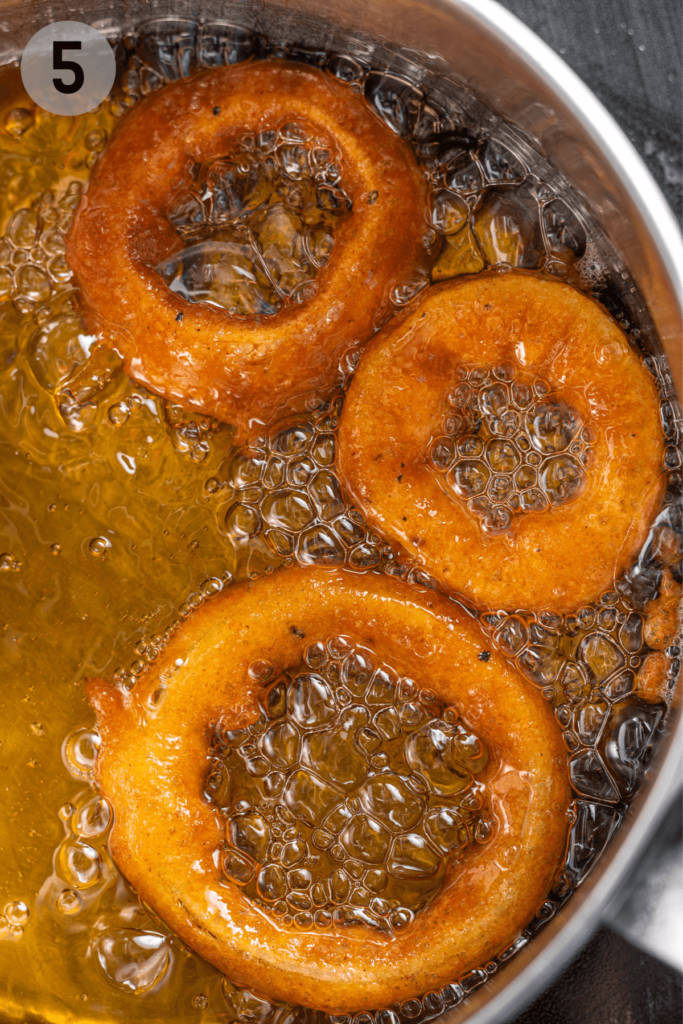
(5) Allow to cook for another 30 seconds to 1 minute until the entire onion ring is nice and golden.
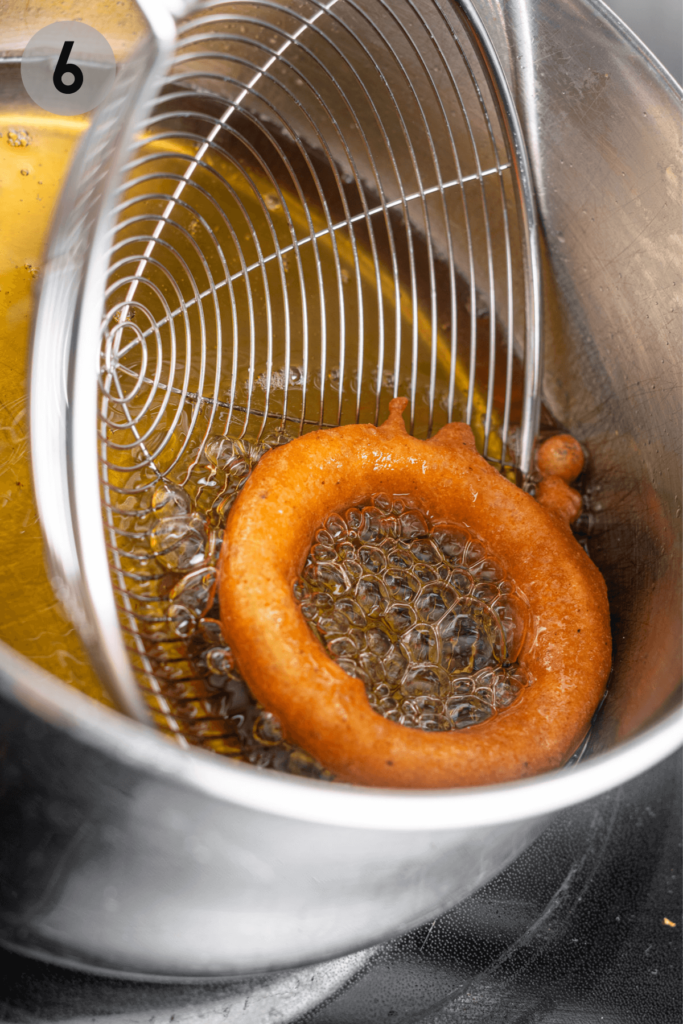
(6) & (7) Use a strainer or spider skimmer to remove the onion rings to a plate lined with paper towel.
Repeat with the rest of the onion rings in as many batches as necessary. If the wet batter starts to thicken too much, add a splash of milk to thin it out as needed.
Once finished, remove the oil from the heat. Allow to cool completely and discard, or strain and save in a closed container to re-use the oil for future frying.

How to Serve Gluten-Free Onion Rings
There are so many ways to enjoy these homemade gluten-free onion rings. Here are some suggestions for how to serve them:
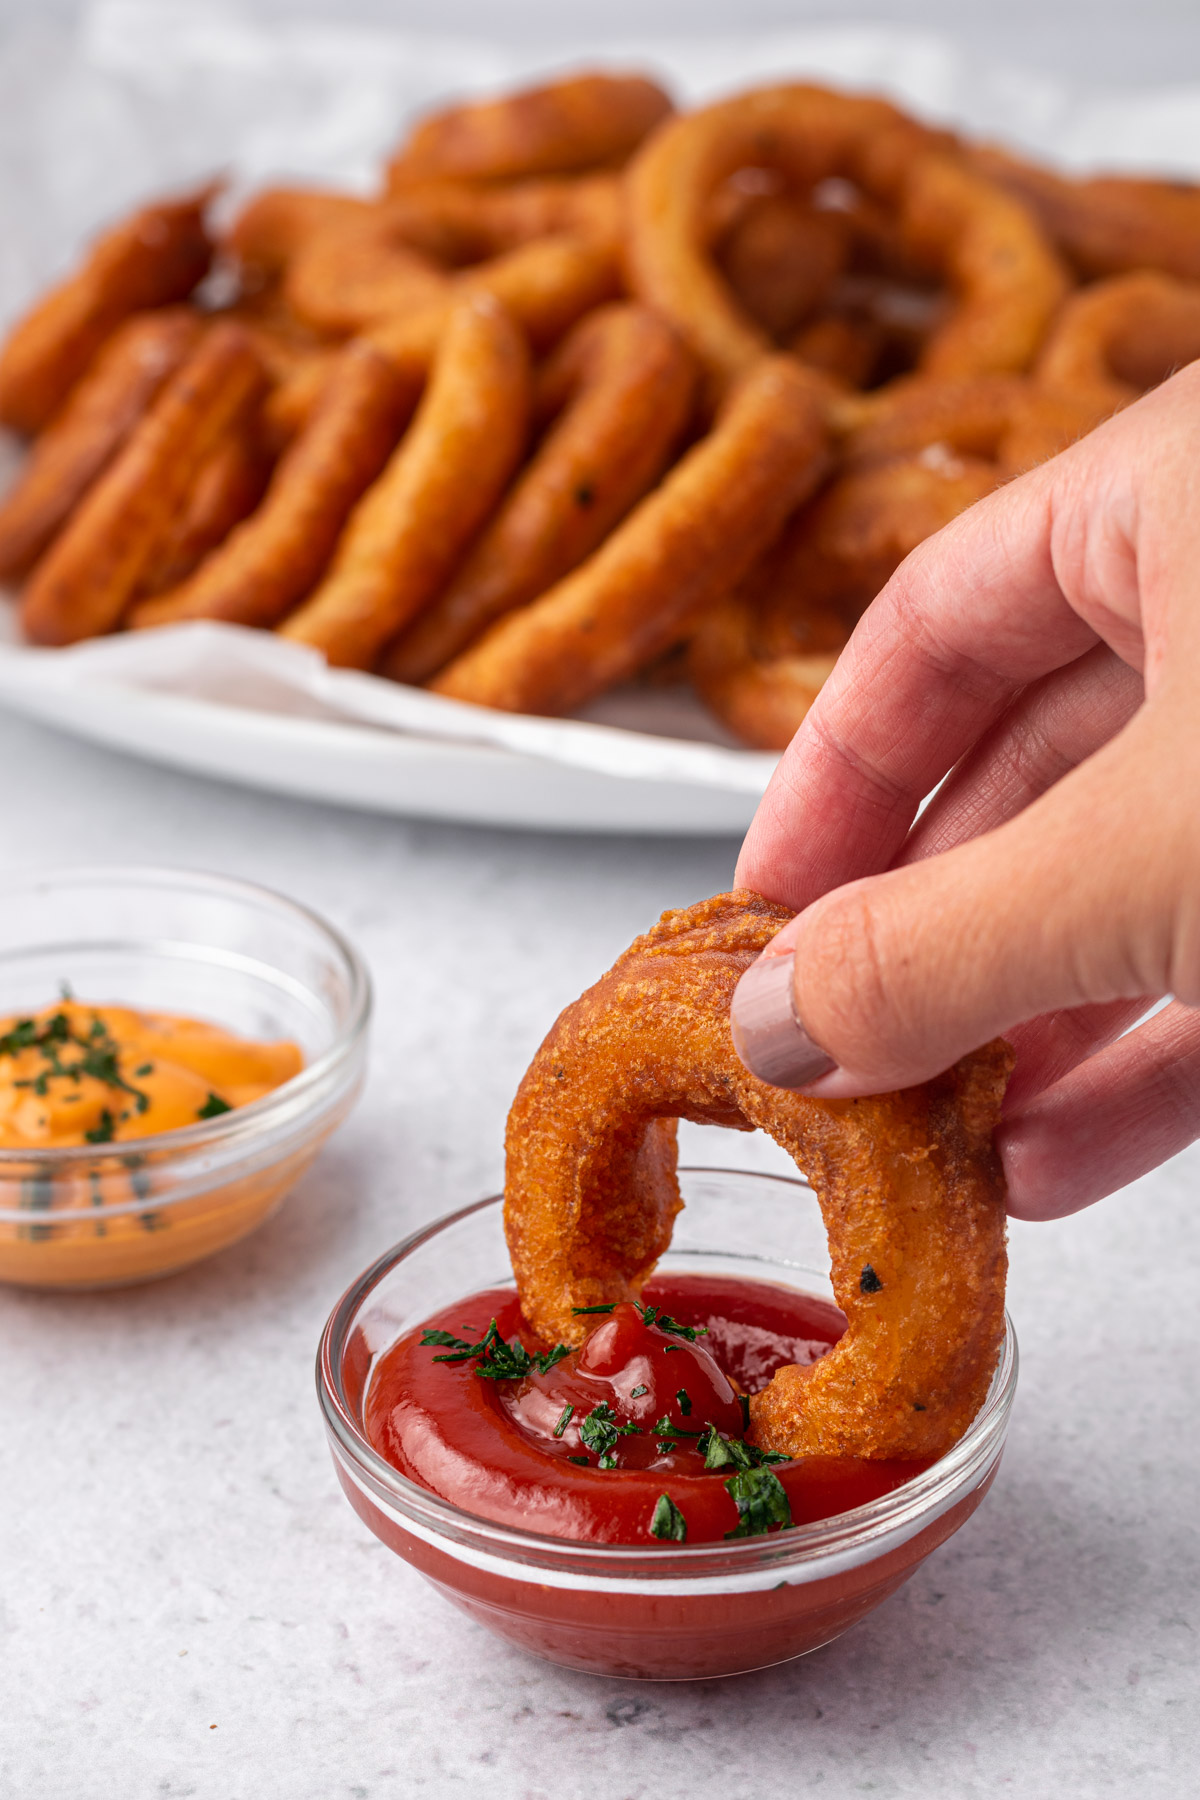
- Plain. Enjoy the crunch of restaurant quality onion rings on their own.
- Dip in ketchup.
- Dip in chipotle mayonnaise.
- Alongside other game day apps. These gluten-free and dairy-free onion rings will be delicious alongside some other football apps such as Gluten-Free Mozzarella Sticks, Crispy Air Fryer Fried Pickles, Gluten-Free Jalapeño Poppers or Vegan Buffalo Cauliflower Wings. Check out all of my gluten-free appetizer recipes here!
Storage and Freezing Instructions
Leftover gluten-free onion rings can be stored in an airtight container in the fridge overnight. To make onion rings crispy again, reheat in a 400ºF air fryer for 3-5 minutes or oven for 5-7 minutes until warm and crispy again.
If you are not going to eat the onion rings within 2 days, I recommend freezing them. Place completely cooled onion rings in an airtight container or freezer bag and freeze for up to 2 months. Reheat in a 400ºF air fryer for 4-7 minutes or oven for 5-10 minutes until warm and crispy again. Enjoy when the craving strikes!

Tips for Success
- Cut the onions thick. You want the most bang for your buck in each onion ring!
- Once the wet and dry ingredients are mixed, start frying. The wet ingredients will activate the baking powder. For the most airy and crispy results, don't let it sit too long. Start frying right away!
- Don't overcrowd the frying pot. You want to be able to see each onion ring so you can judge when they need to flip or be removed based on the colour.
- Freeze if not eating within 2 days. These gluten-free onion rings hold up great in the freezer. They reheat quick per the instructions in the previous section. I recommend freezing if not consuming after frying for optimal texture!
Frequently Asked Questions
The crunch and flavour of white onion holds up great in this gluten-free batter. Many people also enjoy sweeter onions such as Vidalia, which contrast the savoury batter.
These onion rings are very easily dairy-free, however since the egg is integral in binding the batter to the onion rings, these are not vegan. I do not have a recommendation for an egg substitution, but if you are successful with one, leave me a comment below!
Unfortunately this is not the type of batter than can be air fried or baked. The wet batter requires frying to crisp and become solid. But we are frying in a heart-healthy avocado oil, so it makes them a little healthier, right?
I recommend consuming these onion rings on the day that you make them. However, onion rings can be stored in the fridge in an airtight container overnight. If not consuming within that timeframe, I recommend freezing them. When ready to serve, heat in a 400ºF air fryer or oven for just a few minutes until warm and crispy. Best served immediately with dipping sauces.
The longer they sit, the less crispy the onion rings will be. That is why I recommend serving them as soon as possible. If you want to re-crisp the onion rings, heat in a 400ºF air fryer or oven for just a few minutes until warm and crispy. Best served immediately with dipping sauces.
A classic dipping sauce often served at restaurants is ketchup. Mayonnaise or aioli variations are also delicious, such as a chipotle or garlic mayonnaise. Use your favourite!

And there you have it, a recipe for homemade gluten-free onion rings that are also dairy-free and vegetarian. Not to mention they are easy and delicious with just 30 minutes of prep time. These crispy gluten-free onion rings served with your favourite sauces are sure to be a hit at your next summer BBQ or game day football party!
Have you made these gluten-free onion rings? I'd very much appreciate it if you leave a 5-star review below and tag me on instagram @fromoliviaskitchen!
More Apps & Snacks You'll Love


Recipe
Crispy Gluten-Free Onion Rings
Ingredients
- 2 cups avocado oil
- 1 yellow or white onion, medium-large size
- ½ cup cornstarch
- ½ cup gluten-free all-purpose flour I use Bob Red Mill's 1:1 Baking Flour (blue bag)
- 1 teaspoon baking powder
- ¾ teaspoon salt
- ½ teaspoon each: black pepper, paprika, onion powder
- ¼ teaspoon cayenne
- 1 egg
- ⅔ cup milk use dairy-free if preferred
Instructions
Prep
- Pour the avocado oil into a medium size, heavy bottom pot. Turn the heat to medium and allow the oil to heat up while you prep. It should only be about 2 inches deep.
- Peel the onion and slice into thick rings, just over ½" wide. Separate all of the rings.
- In a medium-size bowl, mix together the dry ingredients: cornstarch, flour, baking powder, salt, and spices. Stir with a fork to mix evenly. One at a time, place each onion ring in the bowl and use the fork or your hands to ensure it is evenly coated on the inside and outside. This will absorb the natural moisture from the onion and help the batter adhere better. Place dusted onions on a plate.
- Once all of the onions are dusted, whisk the egg and milk into the dry ingredients. You should have a slightly thick and bubbly batter.
Frying
- To test that the oil is ready, drop a small amount of batter into the pot. It should bubble and brown over 30 seconds. If it does not bubble, the oil is not hot enough. If it instantly browns or even blackens, the oil is too hot. Lower the heat and move the pot to the side for a few minutes.
- One at a time, take a dusted onion ring and dip it into the wet batter, using a fork to flip and ensure all sides are coated. Let any excess drip off before gently placing in the hot oil. Repeat with as many onion rings as will fit in the surface area of your pot. They should brown on the bottom within about 30 seconds. Once brown and bubbled on the bottom, gently flip the onion rings using a fork or tongs. Allow to cook for another 30 seconds to 1 minute until the entire onion ring is nice and golden. Use a strainer or spider skimmer to remove the onion rings to a plate lined with paper towel.
- Repeat with the rest of the onion rings in as many batches as necessary. If the wet batter starts to thicken too much, add a splash of milk to thin it out as needed.
- Once finished, remove the oil from the heat. Allow to cool completely and discard, or strain and save in a closed container for future frying.
- Serve onion rings warm with ketchup, chipotle mayonnaise, or your favourite sauce. See the notes section below for storage and freezer instructions. Enjoy!
Deborah says
AMAZING ONION RINGS!!!
I made these to top a gluten-free green bean casserole, using Bob’s Red Mill Paleo Flour. Because they were going to be baked in the casserole, I left them a little lighter than I would have normally. No matter- they were wonderful, and I’m glad I made plenty!
Deborah says
AMAZING ONION RINGS!!! 5-STAR!!!
I made these to top a gluten-free green bean casserole, using Bob’s Red Mill Paleo Flour. Because they were going to be baked in the casserole, I left them a little lighter than I would have normally. No matter- they were wonderful, and I’m glad I made plenty!
Olivia Parsons says
That sounds like an amazing idea Deborah!! So glad you enjoyed!
Lynda says
I have been looking for a great GF onion ring recipe to make w/a granddaughter! Can’t wait to try this one…. Thanks so much for posting..
Olivia Parsons says
I hope you enjoy these ones!
Eithne says
These turned out so tasty! My husband said they are the best ones he's ever had since his celiac diagnosis 🙂
Olivia Parsons says
Woo thank you so much! I'm so glad you enjoyed.
Yvo says
Could one use olive oil instead of avocado oil ? Or is the avocado oil Essential to success of recipe ?
Olivia Parsons says
Hi Yvo, you don't want to fry in olive oil because it has a low smoke point and will burn. Instead of avocado, use vegetable, canola, or sunflower oil.
Mimi F says
I'm allergic to eggs will applesauce work well for substitution?
Olivia Parsons says
Hmmm.. I'm not too sure in this batter because the eggs really help it bind together. I'd try a flax egg first!
Sher says
light and very crispy!
hiyam says
can they be frozen without cooking?
Olivia Parsons says
It's quite a wet batter, so I wouldn't recommend it for this recipe. I would cook them, freeze, then reheat in the oven or air fryer.
Kevin says
Great recipe and it also works great as a batter for battered fish
Jolene says
Excellent recipe! Exactly what I was looking for! Appreciate the detailed instructions with explanations on why it works as described. The whole family really enjoyed it.
Thank you!