Make fresh summer cherries even better by coating them in chocolate! This simple 3-ingredient recipe doesn't require any baking and can be made in just 15 minutes. You won't be able to stop eating them! They are gluten-free, dairy-free, and vegan.

These Chocolate-Covered Cherries are the ultimate summer snack! Fresh, in-season cherries are coated in dark chocolate. No crazy preservatives or additives here! They are juicy, healthy, and super pop-able!
Make them the way you like by changing up the chocolate, mixing in other fruits, or adding toppings. These chocolate cherries are great to keep in the fridge and enjoy for a summer snack or dessert.
Jump to:
Why You'll Love This Recipe
- Fresh summer cherries! 🍒
- Just 3 ingredients
- Made in 15 minutes
- Keeps in the fridge or freezer
- Gluten-free, dairy-free, nut-free, and vegan!
Want more summer recipes? You'll also like my strawberry cheesecake cookies, gluten-free lemon cookies, and s'mores cookies.
Ingredient Notes
Here are all the ingredients you'll need to make chocolate-covered cherries:
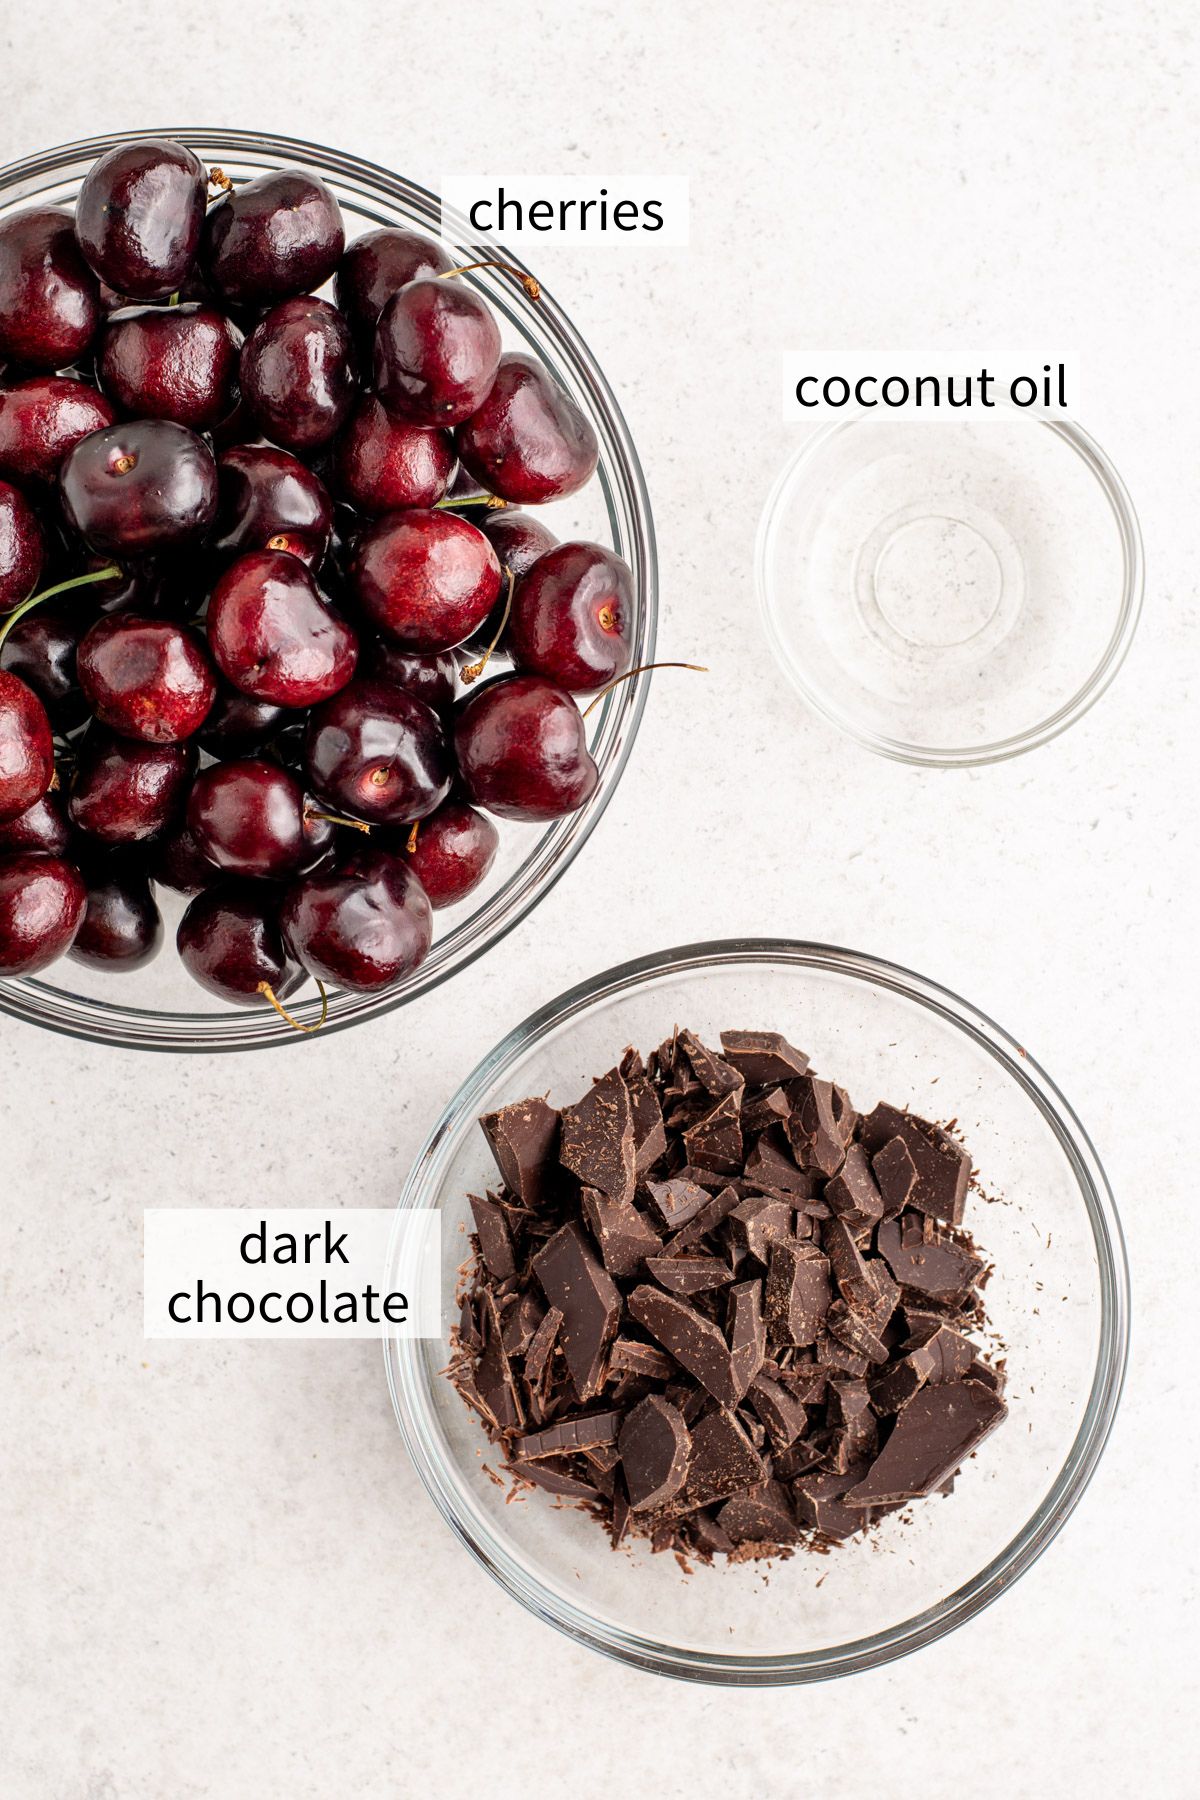
- Fresh cherries: Ensure you remove the pits!
- Dark chocolate: I like 70% but you could go darker or choose milk chocolate. I recommend using a bar of chocolate as chocolate chips will melt quite thick.
- Coconut oil: Just a little thins out the chocolate to the perfect dipping consistency. You could also use vegetable oil.
Substitutions
There are many ways to change up these chocolate cherry clusters. Here are some substitution suggestions:
- If fresh cherries are not in season, you could use maraschino cherries or luxardo cherries instead. Note that they may be sweeter and may or may not have pits.
- Swap out the dark chocolate for milk or white chocolate if you like!
- While the chocolate is wet, you could sprinkle on flaky salt, cookie crumbs, or candies.
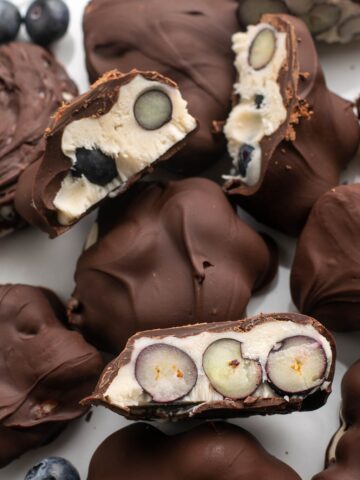
- Use a different fruit like strawberries, blueberries, pineapple, etc. Or make multi-fruit clusters!

Step-by-Step Instructions
Be sure to read the recipe card below for the full recipe.
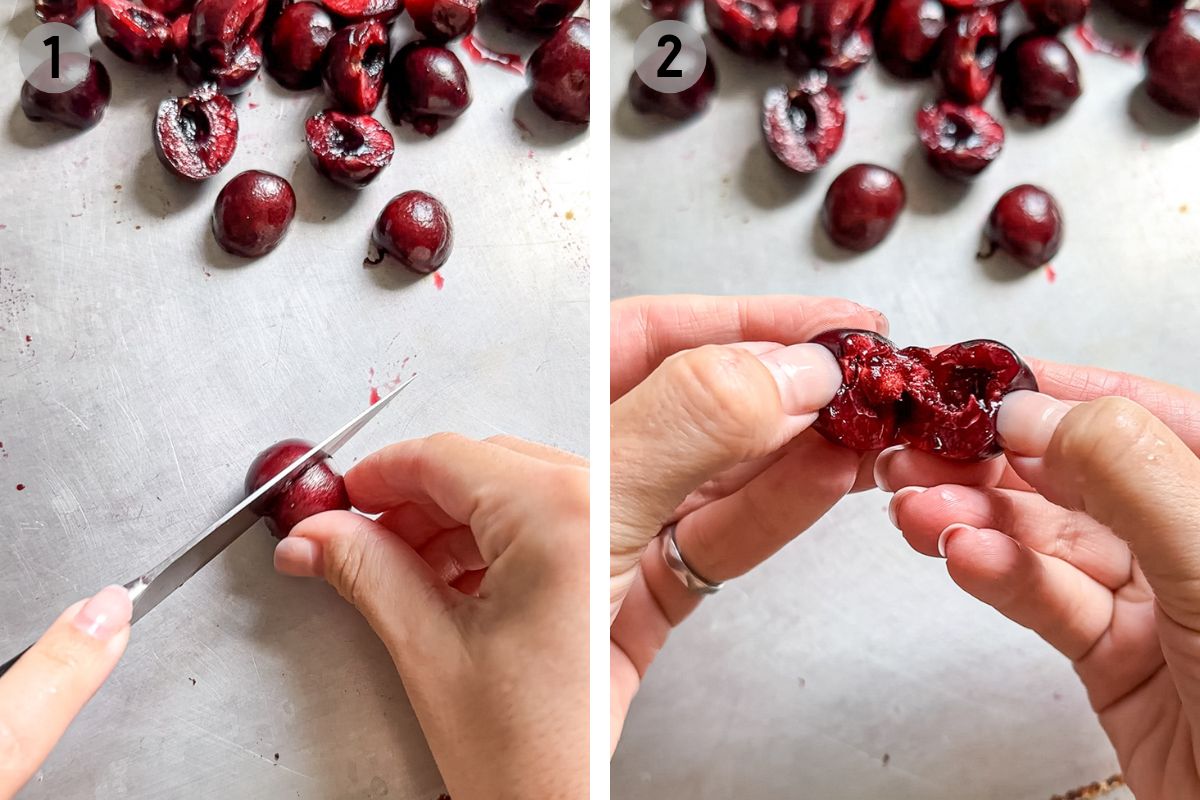
(1) First, you must remove the pits from the cherries. If you have a cherry pitter, use that. If you don't, my favourite method is to remove the stem then take a paring knife and roll the cherry to slice around the centre of the pit.
(2) Use your hands to pull apart the two halves of the cherry and discard the pit. Repeat until all cherries are pitted.
Roughly chop the dark chocolate into small pieces and place in a medium size bowl with the coconut oil. Microwave for 30 seconds, stir, then microwave again until melted.
(3) Use a spoon or fork to dip a few cherries into the chocolate at a time.
(4) Remove, draining the excess chocolate, and place the chocolate covered cherries on a parchment-lined plate or baking sheet in little clusters. Top with flaky sea salt if you like.
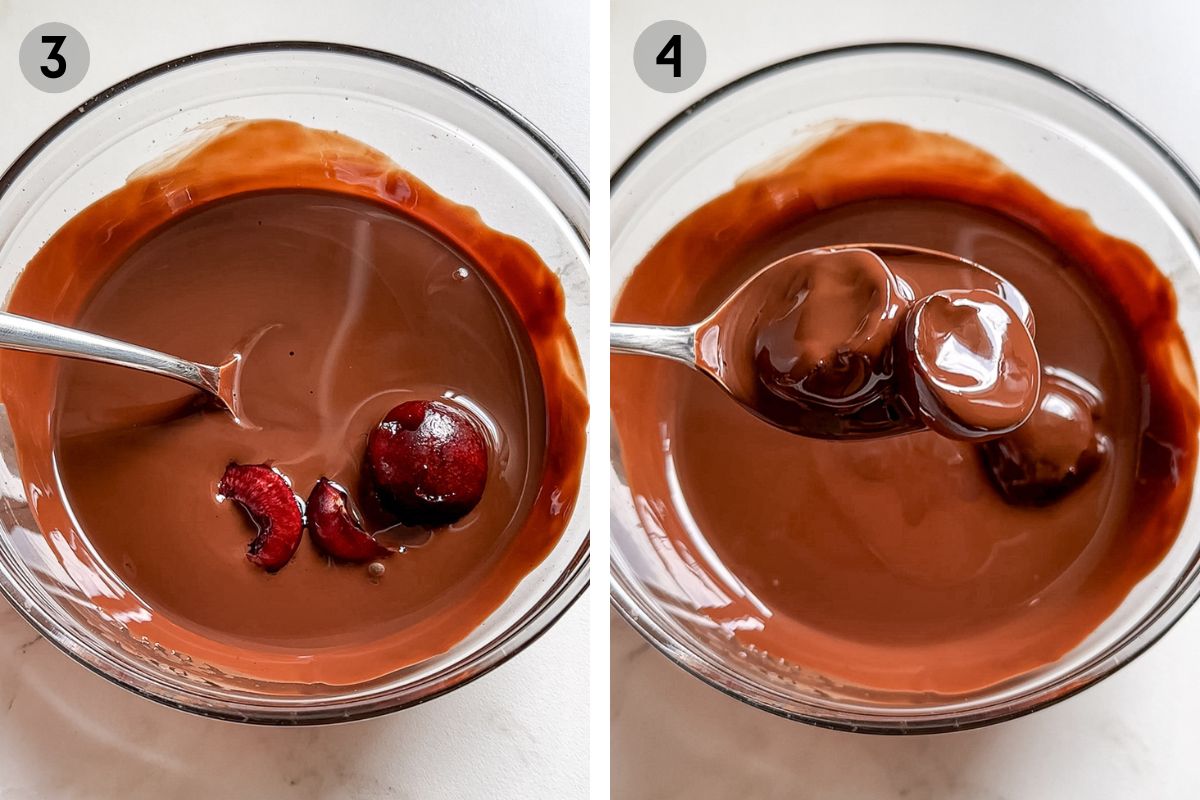
(5) Repeat until all the chocolate and cherries are used up.
Place the cherries in the fridge for at least 30 minutes to solidify.
(6) Transfer the cherries to a closed container and enjoy straight from the fridge. They may melt quickly at warm temperatures.
Keep in the fridge for up to 3 days, if they even last that long!

What to Serve with Chocolate-Covered Cherries
These delicious little poppers are the perfect summer snack or dessert. Keep them on hand for when you need a little sweet treat at the end of a meal. Here are some delicious summer dishes to serve with them:
- Chimichurri Shrimp
- Gluten-Free Salsa Pinwheels
- Gluten-Free Taquitos
- Chimichurri Flank Steak
- Gluten-Free Pasta Salad
- Mango Pico de Gallo
- Gluten-Free Burgers
- Gluten-Free S'mores Cookies
- Gluten-Free S'mores Brownies
- No Bake Blueberry Cheesecake
Check out more gluten-free summer recipes!
Storage
Store chocolate-covered cherries in the fridge in an airtight container so they do not melt. If you've ever had store bought Tru Fru chocolate covered fruit, you could also store these cherries similarly in a bag in the freezer and let thaw for a few minutes before enjoying, for longer storage.
Batching
Scale the ingredient quantities up or down if you want to make more or less. You can also add more fruit into the mix like chocolate-covered pineapple, strawberries, blueberries, or whatever your favourite is.

Expert Tips
Here are some of my top tips and tricks for successful chocolate-covered cherries:
- Use a chocolate bar, not chocolate chips. Chocolate chips have stabilizers to help them keep their shape, which prohibits nice creamy melting.
- Melt the chocolate and the oil together so there is no temperature change. Chocolate can be temperamental with temperature changes.
- Pit the cherries and ensure they are as dry as possible. Pat them with a paper towel before dipping. Chocolate also hates water.
- Place dipped cherries in little clusters on parchment paper on a plate or baking sheet for easy removal.
- Keep in the freezer for longer term storage, and allow to thaw for 15 minutes before eating.
Frequently Asked Questions
If you have a cherry pitter, use that. My favourite method is to take a small paring knife and slice around the pit, rolling the cherry. Then I use my fingers to separate the two halves and pull the pit from the middle to discard.
Bars of milk or white chocolate should melt and coat the cherries similarly. They will taste a bit more sweet but still delicious.
Sure! Try blueberries, raspberries, strawberries, pineapple—any fruit you like can be dipped in chocolate.

These chocolate-covered cherry clusters are the perfect treat for summer cherry season! They couldn't be easier to make or more delicious to enjoy. You'll want to dip all of your fruit in chocolate now!
More Fruit Recipes
- Gluten-Free Lemon Cookies
- Lemon Blueberry Scones
- Blackberry Strawberry Smoothie
- No Bake Blueberry Cheesecake
- Gluten-Free Lemon Loaf
- Bahama Mama Smoothie
- Strawberry Cheesecake Cookies
- Gluten-Free Banana Bread
More Dessert Recipes
- Baked Oats Without Banana
- Chocolate Covered Blueberry Frozen Yogurt Clusters
- Golden Oreo Protein Ice Cream (Ninja Creami)
- Cottage Cheese Chocolate Pudding


Have you made these chocolate-covered cherries? I'd very much appreciate it if you leave a 5-star ⭐️⭐️⭐️⭐️⭐️ review below, and tag me on instagram @fromoliviaskitchen!
Recipe

Chocolate-Covered Cherries
Ingredients
- 1 cup fresh cherries
- 100 g dark chocolate approximately 1 3.5 oz bar
- 2 teaspoon coconut oil
Instructions
- First, you must remove the pits from the cherries. If you have a cherry pitter, use that. If you don't, my favourite method is to remove the stem then take a paring knife and roll the cherry to slice around the centre of the pit. Use your hands to pull apart the two halves of the cherry and discard the pit. Repeat until all cherries are pitted.
- Roughly chop the dark chocolate into small pieces and place in a medium size bowl with the coconut oil. Microwave for 30 seconds, stir, then microwave again until melted.
- Use a spoon or fork to dip a few cherries into the chocolate at a time. Remove, draining the excess chocolate, and place the chocolate covered cherries on a parchment-lined plate or baking sheet in little clusters. Top with flaky sea salt if you like. Repeat until all the chocolate and cherries are used up. Place the cherries in the fridge for at least 30 minutes to solidify.
- Transfer the cherries to a closed container and enjoy straight from the fridge. They may melt quickly at warm temperatures. Keep in the fridge for up to 3 days, if they even last that long!
Notes
- If fresh cherries are not in season, you could use maraschino or luxardo cherries instead. Note that they may be sweeter and may or may not have pits.
- Swap out the dark chocolate for milk or white chocolate if you like!
- While the chocolate is wet, you could sprinkle on flaky salt, cookie crumbs, or candies.
- Store chocolate-covered cherries in the fridge so they do not melt.
- You could also store these cherries in a bag in the freezer and let thaw for a few minutes before enjoying, for longer storage.
Comments
No Comments