These gluten-free Cheez Its taste just like the original you loved! Crunchy, buttery, salty and packed with cheddar flavour, these 5-ingredient homemade crackers are an easy and delicious snack.

These Gluten-Free Copycat Cheez Its are delicious crisp little crackers. With the same iconic look, feel, and taste as the beloved original, folks on a gluten-free diet can now enjoy their own version!
Flavoured with sharp old cheddar, real butter, and gluten-free flour—this recipe can be made with just 5 ingredients! It is a great snack to prep for the week ahead and keep on the counter since they store well. But I can't guarantee they're going to last that long! My gluten-eating taste testers even preferred this recipe to real Cheez Its. Now that's a win!
Missing good ol Cheez Its? Not anymore! Keep reading to learn how easy it is to make your own gluten-free cheddar crackers.
Jump to:
Are Cheez Its gluten-free?
Original Cheez-Its are not gluten-free because they contain enriched wheat flour. There are gluten-free cheddar cracker options on the market by brands such as Made Good and Simple Mills, and while great options, nothing has the iconic Cheez It taste and texture quite like this recipe!
Why You'll Love This Recipe
- Tastes JUST like the original. Even my gluten-eating taste testers preferred this recipe to actual cheez its. That's a win!
- Great for kids and adults. Kids will love these little cheddar crackers.
- Simple ingredients. Just 5 ingredients are needed to make these delicious gluten-free cheez its. And they can easily be made ahead of time.
- Stores well for the week. If they last that long, that is.
Ingredients
Here is everything you'll need to make these gluten-free copycat cheez its:
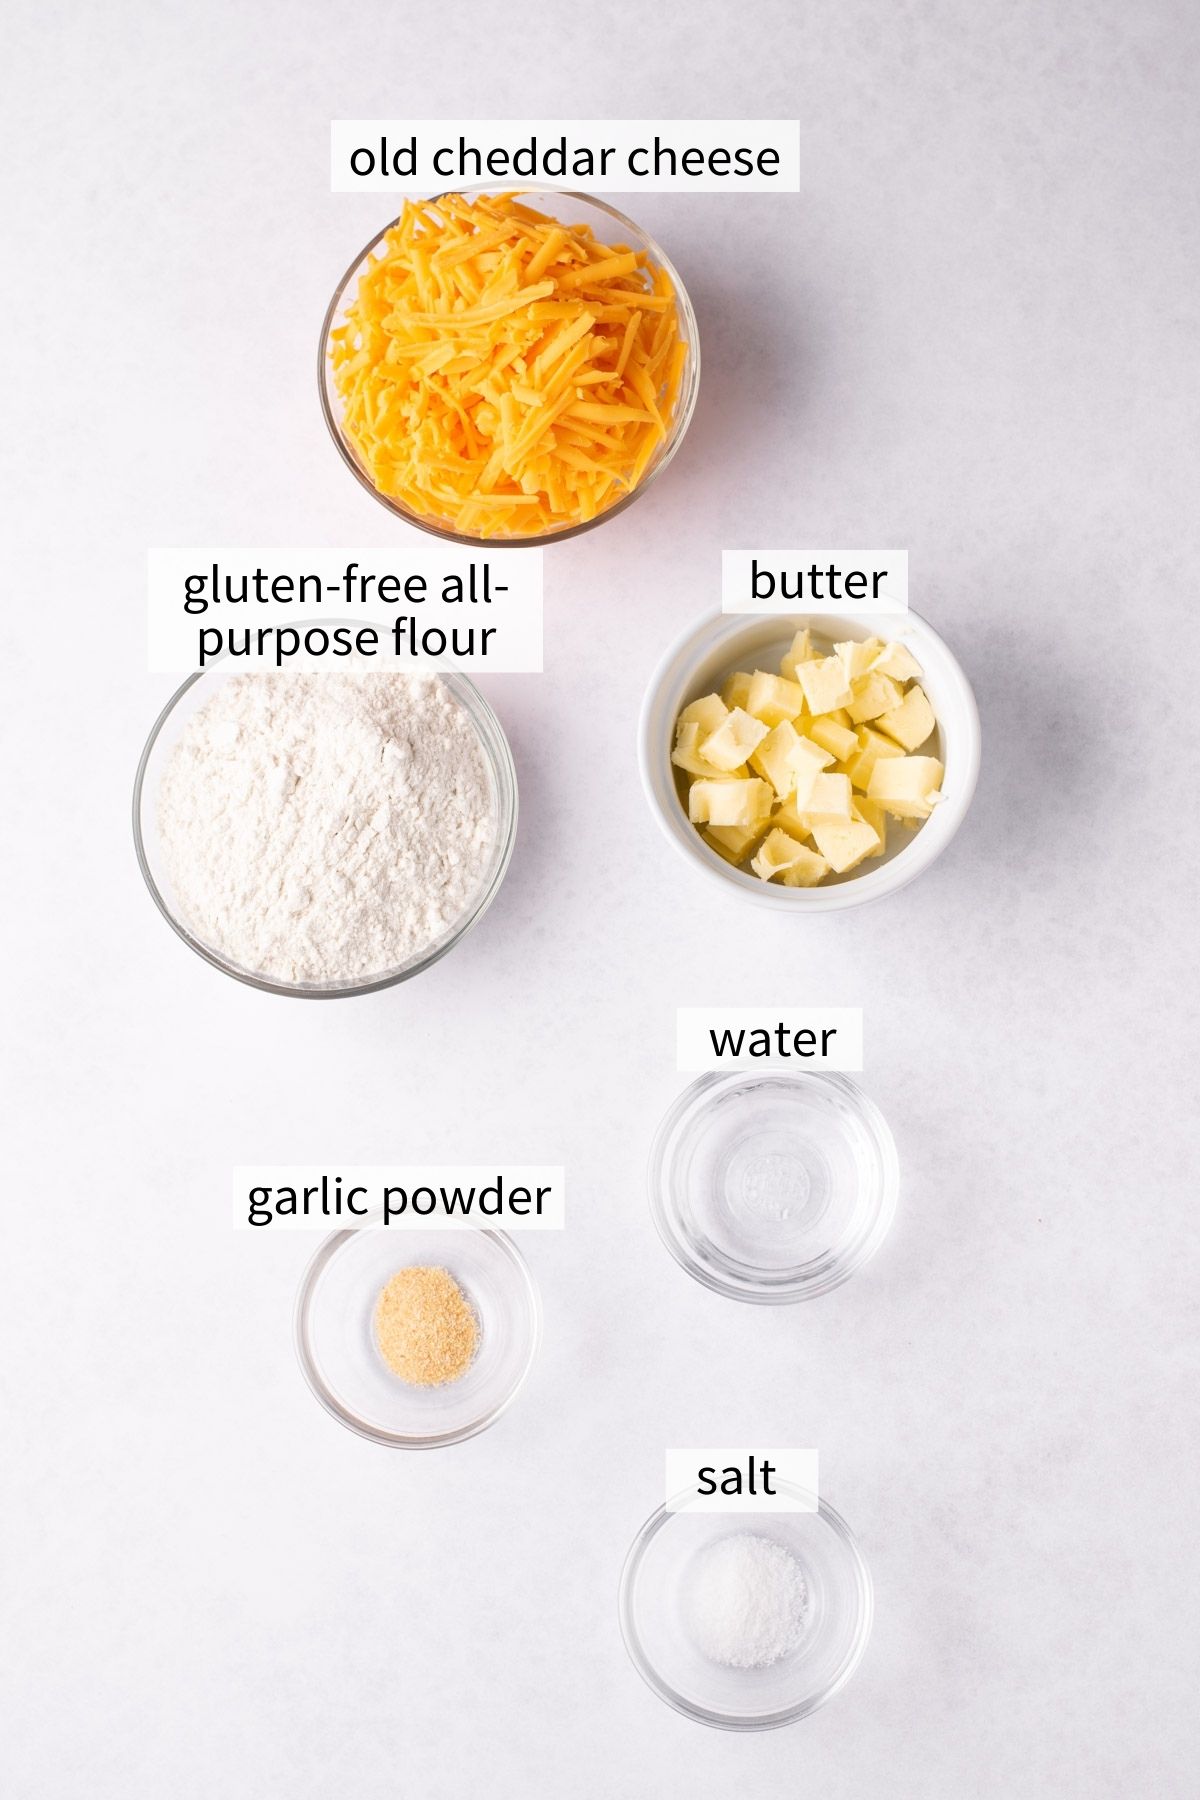
Old cheddar cheese: The "old" part is important. Old cheddar is sharper and stronger in flavour than other cheddar varieties, and you need a punchy cheddar flavour to come through in these crackers. For best results, shred it yourself from a block. Note that I have not tested a dairy-free version.
Gluten-free all-purpose flour with xanthan gum: I use Bob's Red Mill 1:1 Baking Flour (blue bag) or Robinhood's GF Mix. Most brands should work great.
Salt: Now, these crackers are salty. But most crackers are and that's what gives them the irresistible quality of cheez its. Feel free to omit the extra salt sprinkle before baking if you want lower salt, but I find it really enhances the flavour.
Garlic powder: Just a little bit adds a mysterious flavour note to the crackers that is delicious.
Salted butter: Ensure it is cold and cubed. Add ⅛ teaspoon extra salt if using unsalted butter. Note that I have not tested a dairy-free version.
Cold water: While not technically an ingredient since it's already in the house, a few tablespoons of cold water are needed to bring the dough together.
Substitutions
There are many ways to change up these gluten-free cheez its depending on your mood. Here are some substitution suggestions:
- Type of cheese. I recommend a sharp old cheddar for the closest copycat to a real cheez it. But feel free to change up the block of cheese for additional flavours. Ideally you want a bold punch of flavour, and a cheese that can stay cold and shredded. Maybe a spiced jalapeño havarti would be good... but I haven't tested yet.
- Dairy-free. Note that I have not tested this recipe using dairy-free cheese and/or butter. Since the cheese and the butter need to melt nicely together, I'm afraid dairy-free cheese will just not work here. If you've tried it—let me know in the comments below.
- Other flavours. Feel free to add more seasonings to the dough. Onion powder, paprika, cayenne, dried dill, and nutritional yeast would all be delicious additions. Start with ¼ teaspoon of any spice.

Step-by-Step Instructions
Be sure to read the recipe card below for the full ingredient list and instructions for how to make gluten-free cheez its.
(1) Place the shredded cheese, flour, salt, garlic powder, and butter into a large bowl. Mix lightly with a fork then use a pastry blender or your hands to cut all of the ingredients together, breaking the butter into small chunks throughout.
(2) Work quickly to ensure the dough stays cold. Add water, 1 tablespoon at a time, until the mixture comes together to form a ball. Divide into two discs and wrap in plastic wrap.
Helpful Tip: If you have a food processor, it can make this process easier. Pulse the ingredients together, adding water until the dough forms a ball. Divide in half, wrap in plastic, and refrigerate for at least 1 hour.

(3) Refrigerate for at least 1 hour.
(4) Once the dough is chilled, preheat the oven to 375ºF. Flour the counter and use a rolling pin to roll out one half of the dough, adding more flour if anything sticks. Roll the dough as thin as you can without seeing through it.

(5) Use a sharp knife or a pizza cutter to slice horizontal and vertical lines, creating small squares across the dough (see images in the blog post).
(6) Use a bench scraper to lift the squares and place them on a parchment-lined baking sheet.

(7) Arrange squares so that they do not overlap. Use a chopstick or skewer to create a hole in the centre of each cracker. This is optional and just for the classic Cheez It look.
(8) Sprinkle with more salt and repeat with the second dough disc.
Feel free to omit the final sprinkle of salt before baking if you don't like these crackers too salty.

(9) Bake the Cheez Its at 375ºF for 14-16 minutes until crisp. Keep an eye on them to avoid browning, you want them to be a nice golden orange.
Remove from the oven and allow to cool on the baking sheet for 5 minutes before transferring the crackers to a cooling rack to cool completely. They will crisp up as they cool. Enjoy!

How to Serve
There are so many ways to enjoy your gluten-free cheez its. Here are some suggestions:
- Give to the kids or yourself as a great packed-lunch snack.
- Bake a batch to keep on the counter for snacking during the week. (Okay maybe a double batch!)
- Serve as an appetizer at a BBQ gathering.
- Add to your game day snack spread with some gluten-free mozzarella sticks and jalapeño poppers.
- Serve with a charcuterie cheese board for more cheesy flavours! They would pair wonderfully with some cold cuts.
Make Ahead & Storage
Make Ahead Instructions: Cheez It dough can be prepared up to 2 days ahead of time. Store the plastic-wrapped discs in the fridge. They may need 10-15 minutes out of the fridge before you are able to roll them.
Storage Instructions: Gluten-Free Cheez Its store great in an airtight container at room temperature for up to 1 week. They will generally crisp more overtime, but if you notice any softer crackers, place them in the oven for a few minutes to re-crisp.

Expert Tips
Here are some of my top tips and tricks for successful gluten-free cheez its:
- Keep the ingredients cold. Start with cold ingredients and work fast to prevent the butter from melting too soon. Use a pastry cutter or a food processor ideally instead of your hands.
- Refrigerate for at least 1 hour. Allow the dough to re-chill after mixing. This is important for ease of rolling the crackers.
- Watch them while baking. These copycat Cheez Its can go from crispy and golden to crispy and burnt in a matter of minutes. Be sure to watch them when in the oven, and remove when bright orange and crisp. They will continue to crisp up while cooling.
Frequently Asked Questions
Original Cheez-Its are not gluten-free because they contain enriched wheat flour. There are gluten-free cheddar cracker options on the market by brands such as Made Good and Simple Mills, and while great options, nothing has the iconic Cheez It taste and texture quite like this recipe!
Note that I have not tested this recipe using dairy-free cheese and/or butter. Since the cheese and the butter need to melt nicely together, I'm afraid dairy-free cheese will just not work here. If you've tried it—let me know in the comments below.
These homemade gluten-free cheez its will last for about a week in a sealed container at room temperature. If you don't eat them all first, that is!

This gluten-free cheez its copycat recipe is the ultimate snack! They taste just like the original crisp and cheesey cracker you loved, except now they are homemade and gluten-free. These gluten-free cheddar crackers are perfect snack to munch throughout the week. Enjoy!
More Gluten-Free Snacks:
Related Recipes

Have you made these copycat gluten-free cheez its? I'd very much appreciate it if you leave a 5-star ⭐️⭐️⭐️⭐️⭐️ review below, and tag me on instagram @fromoliviaskitchen!
Recipe

Gluten-Free Cheez Its Copycat
Equipment
- Food Processor optional
Ingredients
- 1 cup old cheddar cheese shredded and packed into the cup
- 1 cup gluten-free all-purpose flour with xanthan gum I use Bob's Red Mill 1:1 Baking Flour (blue bag) or Robinhood's GF Mix
- ½ teaspoon salt plus extra for topping, add ⅛ teaspoon extra if using unsalted butter
- ¼ teaspoon garlic powder
- ¼ cup salted butter cold and cubed
- 4-5 tablespoon cold water
Instructions
- Place the shredded cheese, flour, salt, garlic powder, and butter into a large bowl. Mix lightly with a fork then use a pastry blender or your hands to cut all of the ingredients together, breaking the butter into small chunks throughout. Work quickly to ensure the dough stays cold. Add water, 1 tablespoon at a time, until the mixture comes together to form a ball. Divide into two discs and wrap in plastic wrap. Refrigerate for at least 1 hour.
- Food Processor: If you have a food processor, it can make this process easier. Pulse the ingredients together, adding water until the dough forms a ball. Divide in half, wrap in plastic, and refrigerate for at least 1 hour.
- Once the dough is chilled, preheat the oven to 375ºF. Flour the counter and use a rolling pin to roll out one half of the dough, adding more flour if anything sticks. Roll the dough as thin as you can without seeing through it. Use a sharp knife or a pizza cutter to slice horizontal and vertical lines, creating small squares across the dough (see images in the blog post). Use a bench scraper to lift the squares and place them on a parchment-lined baking sheet.
- Arrange squares so that they do not overlap. Use a chopstick or skewer to create a hole in the centre of each cracker. This is optional and just for the classic Cheez It look. Sprinkle with more salt and repeat with the second dough disc.
- Bake the Cheez Its at 375ºF for 14-16 minutes until crisp. Keep an eye on them to avoid browning, you want them to be a nice golden orange.
- Remove from the oven and allow to cool on the baking sheet for 5 minutes before transferring the crackers to a cooling rack to cool completely. They will crisp up as they cool. Enjoy!
Notes
- Cheese: For best results, don't use pre-shredded cheese as it won't incorporate into the dough as well. Shred it yourself from a block.
- Use a food processor: If you have a food processor, it can make the creation of the dough easier. Pulse the ingredients together, adding water until the dough forms a ball. Divide in half, wrap in plastic, and refrigerate for at least 1 hour.
- For less salt: Omit the final sprinkle of salt before baking.
- Spices: Add extra spices if you want more flavour. Onion powder, paprika, cayenne, dried dill, and/or nutritional yeast would be great.
- Make Ahead Instructions: Cheez It dough can be prepared up to 2 days ahead of time. Store the plastic-wrapped discs in the fridge. They may need 10-15 minutes out of the fridge before you are able to roll them.
- Storage Instructions: Gluten-Free Cheez Its store great in an airtight container at room temperature for up to 1 week. They will generally crisp more overtime, but if you notice any softer crackers, place them in the oven for a few minutes to re-crisp.
MomB96 says
Can't wait to try this for my teen who has recently gone GF in hopes of diminishing her Tourette's tics!
Olivia Parsons says
I hope you enjoy this recipe and wish you good luck on your journey 🙂
Tiffany says
These were amazing! Made this for my celiac kiddoes🙂
Olivia Parsons says
I'm so happy your family enjoyed!!
Christeen says
Absolutely delicious! My celiac child loved these and so did everyone else. Great recipe, Thank you.
Olivia Parsons says
So happy to hear! Thanks for reviewing.
Shay says
These were a huge hit with all of my boys! They ate the entire batch in minutes! Thanks for a great recipe!
Mady says
What are the instructions if you do not have a food processor? Would a blender work?
Olivia Parsons says
The written recipe has instructions by hand!
mady says
I made these today and i love them! my non gluten free husband also loves them. I don’t have a food processor but used a blender which worked great. I also didn’t have garlic powder so used onion powder.
I had to wait for the dough to be room temp to roll it out without it falling apart but once i warmed it up with my hands it was a breeze. Thanks for the recipe!
K says
These were very good but I used an aged white cheddar. I did have some difficulty when I tried to roll the divided dough out. I found it easier to divide the dough into fouths and to work with a smaller piece of dough. Other than that, they turned out great.
Debra Holland says
I followed the directions exactly then added some dry mustard. Absolutely delicious! I have missed cheezits so much since going gluten free! These are even better😋
Elizabeth says
Delicious!! Made them with my grandkids. Soo much fun and cheesy buttery AND Gluten free.